Monday, February 21, 2011

ATI HDMI output problems-solutions (overscan)

So in the recurring theme of my HTPC buildup, I have found a few fixes.

First a problem with a workaround. I found that my remote, using the MCE remote hardware and AutoKey software to allow the remote to act like a mouse, stopped working correctly.

In XBMC and WMC mode it worked properly...but when in mouse mode, it would not correctly move the cursor.

The problem is that I set the display to Large (150%) to make it more readable from the couch...unfortunately that is the problem...the only solution is to go to the next lower display setting.

New issue...

Since I started using the HTPC I have been playing with display settings, both on the HDTV and on the PC. I turned off all the overscan settings on the TV to get a 1-1 pixel display. So all TV stuff worked fine (BD, off the air, etc). But the HTPC display had about a 2" black border.

I lived with it for a while, after I exhausted my search through the ATI Catalyst settings. Then I typed that issue into Google, and found a forum thread with the solution (I don't have the thread handy).
The following screen shots show a 'hidden' menu and settings.

Here is the normal Catalyst Control Center (CCC) menu. The third or fourth choice under the "Graphics" menu is this one.
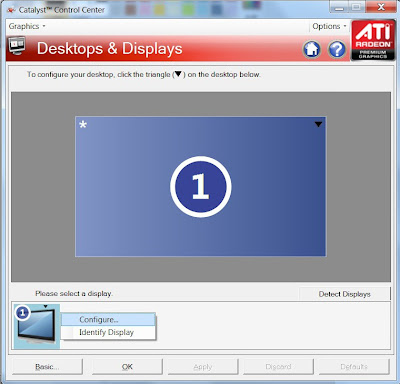
The hidden menu part is here...you have to right click on the small TV icon (or click the black triangle on the small tv icon) to get a menu that shows "Configure". If you follow their directions and click on the black triangle on the big TV icon, you get Rotate, Properties, Identify.


Now after you click "Configure" you get this window. Just click on "Scaling Options" and you see this.
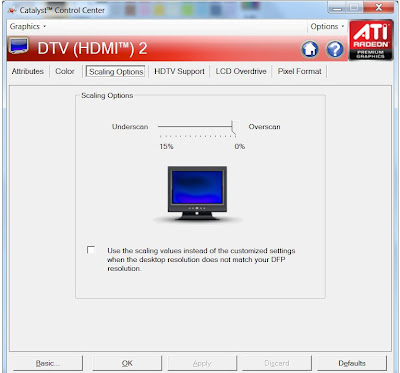

In my case I had to drag the overscan all the way over to fill the TV...also it made the text look better.

Who knows why ATI hides this...

Oh well, all fixed now.

Saturday, February 12, 2011

Audio delay using Creative X-Fi and Win7

It seems that Creative's audio cards are really not up to par for many things...and the software seems to leave a lot to be desired.

I have had continuous problems using the card and Win7...mainly my audio inputs wouldn't work.

I did an uninstall and reboot, Win7 popped up a window with a link to new drivers. I installed them and that is when I noticed the audio delay.

FTR I think the audio panel is a huge PITA to configure.

This link had the solution.

Priestest: Users MedalsOkay. I have the solution. Right click the speaker icon (on windows 7) on the task bar then left click on "recording devices". Right click on the microphone and left click on properties. Go to the "listen" tab and make sure the "listen to this device" check box is unchecked. Okay now close the microphone properties window. The "sound" window should still be open. Go to "playback" tab,right click on speakers and left click on properties. Then click on the "levels" tab. You should see a microphone section with its playback volume muted. Unmute it and increase or decrease the playback volume as desired. There should be no noticeable delay when you speak into the microphone now. :)
Yup, this completely solved the delay.

Wednesday, February 9, 2011

ReadyNAS NV+ drive upgrade

I have 2 ReadyNAS NV+ devices. One I bought new, the other used off Ebay.

The used one I store my media files on.

Going into the deal I knew I would have to exchange the drives for larger ones, I was simply waiting on the prices to come down a bit...BTW the ReadyNAS devices only support certain drives of each size, so before you buy drives, check.

I bought 4 2TB drives that were on sale (and were compatible) from Newegg. (OEM drives but full warranty and packed nicely).

This particular ReadyNAS was formatted with their X-RAID system, a redundant, expandable, hot swappable system. So I thought I would see how well it worked.

As far as speed goes, I can stream BD rips off it in full HD, so that doesn't seem to be an issue.

I already had 4 drives installed, so I didn't test part of the expandability of the system.

I am not big into hot swapping, so I didn't attempt that.

But part of the X-RAID expandability is you can exchange smaller drives for larger ones without having to move your data off the system, and back on. I did this.

According to the Netgear site, I could have done this upgrade while hot swapping.

I turned the system off (using the web based interface) pulled one 500gig drive out and replaced it with the 2TB drive. I started it back up and it started crunching data.

The machine said it would take 17 hours to fix the drive...same procedure if you had a drive go bad and replaced it. I started it before I went to bed and it was done before I got up. Checking the logs, each drive took 6.5 hours to sync. Then after a reboot the ReadyNAS expanded the filesystem, and that took maybe 30 minutes.

If I had elected to pull the data off on to a backup device and do all the drives at once, and put the data back on, it would have probably been quicker. But in this case I wanted to see if it would work, and I didn't want to fool around with a backup...things always happen, and you have to start over...especially when dealing with many files.

Monday, February 7, 2011

Ubuntu keeps breaking printers...fix

It is amazing, but every update of Ubuntu changes something in the printer section, and you have to trouble shoot.

I had to a clean Ubuntu install because a SSD drive went bad. I reinstalled the printers, (using my notes on this blog ;), but the Dell 1320C would not print.

It would print a test page, but not a document...oh BTW it is the wife's computer, and she does not do tech (I need to get OSX reinstalled pronto)

So I searched for "ubuntu will print test page but not document" and found a ton of links...I went to a few and found interesting things like http://localhost:631 will take you to the CUPS page...all sorts of printer admin stuff there (on your computer obviously)

That was all well and good but no fix to my problem.

I kept following links and found this page.

The fix is...

When I installed the Dell 1320C, Ubuntu put the printer's "Device URI" as socket://192.168.1.185:9100 .

That link says that "socket" times out, so to fix simply change the address to lpd://192.168.1.185 , remove the :9100 also

So from

socket://192.168.1.185:9100

to

lpd://192.168.1.185

I did that and it worked right away.

I still don't have a reason that every Ubuntu update breaks my printers.