Tuesday, October 23, 2012

Canon camera to Nook Color using USB host mode.

A new project based on this post at Steve's Digicams.   First some links... (writeup is finished...I will add pictures etc later)

Original story I followed...Control Your Canon Camera From Your Android Device
http://www.steves-digicams.com/news/control_your_canon_camera_from_your_android_device.html

Remote Release     https://play.google.com/store/apps/details?id=eu.chainfire.remoterelease
DSLR Controller (BETA)  https://play.google.com/store/apps/details?id=eu.chainfire.dslrcontroller
...or homepage here... http://dslrcontroller.com/

Android device compatibility http://dslrcontroller.com/devices.php

http://forum.xda-developers.com/showthread.php?t=1202082

http://forum.xda-developers.com/showthread.php?t=1369684

i9100 usb host cable

Nook Color Tweaks  https://play.google.com/store/apps/details?id=com.dalingrin.nookcolortweaks
USB Host Controller  https://play.google.com/store/apps/details?id=hu.sztupy.android.usbhostcontroller

Here is the story...

So I have a Nook Color, running CM7 (Cyanogenmod 7) a modified version of Android for the Nook, gives more features than the stock Nook Color OS.

According to the first link, CM7 comes with USB Host Mode enabled ready for the Nook Color.  This allows the Nook to actually access USB devices, mount drives, etc., normally the Nook will simply act as a usb drive when connected to a computer...now it actually acts like the computer.  You need to enable it in software, I used Dalingrin Nook Color Tweaks to do this, but there are some USB host mode apps that should do the same thing.

Other than a Nook Color (in my case) and the software, you need a cable...and it seems that any USB gender changer will work, the link above is to specifically look for a certain type of USB Host Mode adapter.

First test (after I got a cable) was to see if I could read USB devices, card readers etc through the usb port.

Well, I had an older Release Candidate of CM7 and although the options were there, it would not access USB devices...so I wiped my SD card and started over with the current stable version 7.2.

With that version I was able to use some USB devices...specifically a few thumb drives, and my GoPro.  The GoPro acted as a thumbdrive, so I could view the pictures on it.

Next step is the Canon Rebel XS (1000d)

I may probably post some video or pictures of the setup...but really there isn't much too it.  Using the USB Host Controller App really helps in troubleshooting.  If  you have your camera connected (and turned on) and run that app, it will show up in the list of USB devices (second tab) if everything is working right.

If it doesn't show up, check your USB host mode again.

I used the free Remote Release App by Chainfire first to test connectivity between the Nook and the Canon.  That step is recommended by Chainfire to keep folks happy...if that app won't control your camera, then the DSLR Controller App will not control your camera.

When it is up and everything running fine...you will get something like this...


 The app has a lot of options, including HDR (your choice of bracketing) changing ISO and manual focusing.

I really simply wanted a handy way to live view for focusing, and for preview/reviewing pictures...it does that easily.

I have to recommend this if you already have the Nook and the Canon...if you don't have Nook...then go get one!
Sunday, October 7, 2012

Baofeng UV-5R...how do I program it?


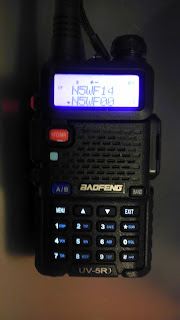
I bought the famous (?) $50 Baofeng UV-5R Dual-band amateur HT (walkie talkie) 70CM and 2M.

Because it is $50 the menus for programming it are painful to use, but programming it using software is pretty much like programming any other radio using software.

I will show some steps, and screenshots to walk it through, but for now here is the quick list.

BTW mine has the BFB251 version of the ROM (power on holding the "3" button down).  I just got it about a month ago...they are up to version 293 I believe.


I just got a 251, and just programmed it. Make sure you have the basics
covered.

This blog post has, how to set up USB cable, basic CHIRP instructions, VIP instructions.  (and I am always willing to improve it...just let me know)


Important links


Miklor's Baofeng UV-5R page full of resources

-Miklor's USB driver page

-Miklor's  VIP software page

-Miklor's CHIRP software page

Danplanet THE CHIRP site.


Plug in USB adapter.

1. make sure that your USB cable was installed as a "Prolific USB-to-Serial Comm
Port" (look in Device Manager/Ports)


2. make sure that the driver for that port is Prolific 3.2.0.0
(Properties/Driver)


3. Note what comm port is assigned to that Prolific USB-to-Serial Port (COM )


CHIRP software instructions.

(CHIRP as of 6Oct12, may not support BFB291 or later to to vendor detection issues)

4. When you start CHIRP, make sure it is using the correct serial port.


5. An 'unable to connect to comm port' or some error like that probably means that the driver is wrong

6. An 'unable to connect to radio' type error means you need to make sure the plug is installed all the way (I had to trim a bit of plastic off the bottom of the plug. (or in this case I selected the wrong comm port).


7. make sure you are using the very latest 'daily build' CHIRP software (I have the 5 Oct 2012 version)


Note:  It was suggested to me on the Baofeng yahoo group by Jim (KC9HI) that the latest 'daily build' may not suit your needs.  If it doesn't work, take a look at the Danplanet CHIRP 'Activity Page' to see which version may suit you.

I am not in the CHIRP users group, so I don't follow what is going on there.

I followed the Miklor Chirp page.


VIP Software instructions.


1. Use correct version for radio...the software even tells you which version it is for.


2. The older version opens up in Chinese fonts (which most of us do not have installed...just go to the second pull down menu on the right, and select English.

 Close that front window...don't worry you can get it back later.


3. Now select Comm Port, click the Communication Menu and this window will pop up.


 My adapter was on COM3


4. Download from radio...do this before editing your channels.


 Select 'Read'


Now you can edit if you want.


These are the programmed channels on your radio.


This menu has other optional settings.


This menu lets you change your power on message...as it says, Read from radio first, then edit and Write back to radio.


How to save and load your hard work...


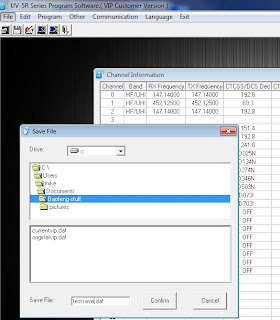
To save your work, File, then "Save".

"Save As" didn't work for me.


It looks like an old Windows 3.1 interface,
so finding the directory you want is a bit clunky...but it works.


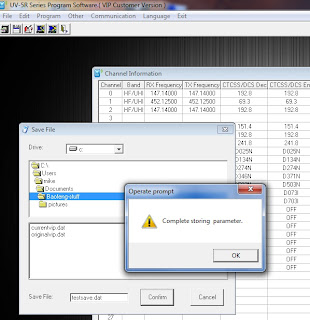
And just type in the name. (.dat) 


That gibberish means it saved correctly. 


To open a file it is the same clunky menu system.


But this time just select the file you want.


And this means you correctly loaded it.


For editing the memories etc...you are on your own, I copied the ones from my other radios, and had to edit them with excel in a format that matched what I downloaded from the radio using CHIRP. (save as csv...then after you are done editing IMPORT back into CHIRP.

I only used the VIP software for changing the power on message.


Wednesday, September 26, 2012

Buffalo HS-DH500GL Hard drive swap

(note: this was in the draft folder for some reason...I did this project over a year ago...)

I picked up the Buffalo HS-DH500GL GigaBit LinkStation a few years ago...I was using it as a portable FTP server for a IP camera capture.

And haven't used it since. So I fired it up and started to use it...and immediately filled the drive. 500GB just doesn't go as far as it used to.

On clearance I picked up a pair of 1.5TB WD My Book Essential USB drives. I figured I could plug them into the LinkStation for more space. Bad idea. Twice the drives went blank...just lost the data, and then both started creating nested directory copies...apparently infinitely. And because of this activity the LinkStation kept overheating and shutting down.

So I had a great idea...I would use those 1.5TB drives for something else. I thought about using them in my ReadyNAS NV+...but they weren't on the approved HD list.

So then I had the bright idea of putting one of the 1.5TB drives into the LinkStation...how hard could that be?

I won't get into disassembly of the LinkStation...there are web sites with that...but it is one screw for the front cover, pull a cable, two screws and slide the drive out, then two screws to remove the interface. The WD My Books are snap together plastic with two screws holding the electronics to the drive.

Needless to say I did a lot of research before I attempted this...and much of it was wrong.

I used a HD to USB adapter to do all this. Specifically the Apricorn Drive Wire Universal HD adapter. (SATA, IDE, laptop IDE)

I used partimage on Ubuntu to make an image of the first two partitions (in my case sde1 sde2).

I ALSO wrote down what partitions were where, what kind, and how big.

I then swapped drives and ran Gparted on the 1.5 TB drive. I deleted any partitions on it.

I made the following partitions in order so they would match the original. And I made them all slightly larger so that partimage wouldn't complain later (it still did once).

sde1 - 206MB EXT3
sde2 - 520MB XFS
sde3 - 10MB ext3 (it didn't show in the original, but I wanted (needed?) to make the partition numbers match

sde4 - then I made an extended partition for the rest of the drive (1.4TB)

sde5 - 140MB linux swap
sde6 - the rest of the drive XFS (1.4TB)

Then I used partimage again to write sde1 and sde2 to the drive.

Then I put it in and turned it on...it worked right away.


Of course it was attempt 5 that actually worked right away...I tried just doing one partition and then a firmware update (wrong) the first time I tried to copy the sde2 back over the partition was too small...even though it was larger than the original...so I had to re-partition the rest of the drive again...1.5TB...and the last attempt after re-partitioning...I forgot to copy the sde1 and sde2 over.

So this took me a couple of days until I got the right procedures (I had to screw the interface back to the drive every time I wanted to test it...then it took about 2 hours.

And I have a 1.5 TB NAS. BTW, the reverse was easy, I put the 500GB drive in the WD My Book, and it wiped it and reformatted automatically.

iPhone 3GS 5.1.1 Jailbreak Unlock

Anyone who follows this blog probably knows why I have a 3GS (still).

So I will get to the hacking.

Once again it was time to upgrade, this time from 5.0.1 to 5.1.1, mainly because an App I use needed the upgrade.

It seems like everytime I do the Jailbreak I have to re-research it, and it changes a little bit.  I even look at this blog to see what I did last time.

Well to be honest I don't know if much changed, it seems the JB tools out there (sn0wbreeze, redsn0w) have improved quite a bit and most of the task is automated.

Quickly here is my setup.  I have a 3GS with the old bootrom (digits 3-5 of its serial number are 926).  I have the 5.13.4 baseband.  Keeping my current baseband allows easy unlocks.

So now the fun...btw this took 2 different computers and 3 cables.

First on my laptop with 2gig ram I downloaded the 5.1.1 ipsw file from here and redsn0w 9.14b2 from here.

I ran redsn0w and  clicked the Extras button, then Custom IPSW...loaded up the 5.1.1 ipsw that I downloaded and selected preserve Baseband.

On my laptop at around this point, redsn0w would fail with a out of memory error. (I did some more fooling around at this point, but won't bore you with the details)

Now I tried the same thing with my Desktop (4gig) this time it generated the no baseband ipsw for me.

Again using redsn0w and selecting the Extras button I then selected Pwned DFU to put the 3GS into a recovery mode.

Now open iTunes, it says you have a phone in recovery mode blah blah blah.  Ok that message, and hold the Shift key while clicking the Restore button.

If you are like me, you will get errors such as 2500 (I think) and or a 1600 or 1601.  The 2500 means you have a cable problem...so use a different cable.


The 1600 or 1601 is because iTunes looks something up on the internet, and doesn't like what it sees.  The fix is to edit your HOSTS file.

This file is located at (Win7, but probably all versions)...

C:/Windows/System32/drivers/etc/

You will see some commented out items (a line with a # in the front is considered commented out).

Find the line with gs.apple.com at the end, and either erase the line, or put a # at the beginning of the line...like this...

#74.208.10.249 gs.apple.com

then save the new hosts file.   If you are like me, you will have to save it on your desktop, delete the one in the folder, and paste the one from the desktop to the folder (due to administrator privileges and other protections)


So the restore finally finishes (after you start it again).  Don't bother setting up your phone, just start redsn0w again and this time hit the Jailbreak button.

The next screen opens up with Install Cydia selected and nothing else.  I didn't change a thing and started the process.

Just follow the directions...BTW I did this with the sim card removed...I don't know if it was required, but it worked.

After the phone reboots, you will have to do the initial setup, I then let iTunes reload my backed up apps and settings, and after a bit I started Cydia.

In Cydia, I let it do its updates, then searched for Ultrasn0w.  Clicked on the item and installed it.  That was the unlock.

After that I just let the rest of the apps be restored, and my previous Cydia items...I think after I ran Ultrasn0w I installed the SIM card, and all was well.

Thursday, August 30, 2012

Thunderbird Calendar won't sync to Google Calendar - fix

I have been using Mozilla's Thunderbird Mail/Calendar program for quite a while now, and faithfully letting it do its updates...normally no problems.

I have the Lightning Add-On for Thunderbird that adds the Calendar sync, but it requires another add-on to access Google Calendars (for read/write). Apparently that add-on Provider for Google Calendar did (or does) not automatically update...you have to manually install the new version.

So if your Thunderbird calendar suddently stops accessing your Google calendar...see if you need to download some new plugins.

Wednesday, August 29, 2012

OpenVPN tunneling...revisited

A while back I finally got OpenVPN working, mostly it took the installation of version 2 of IPCop as my router software.

I could log into the VPN on my server remotely...but I didn't have access to my network or anything else.

I put that project on the back burner until tonight, when I found out my ObiHai110 was having issues and I was going to remotely admin it...over the VPN...

Very long story with much rebooting and Googling/OpenVPN forums reading...

I was missing a command on my server, the command that tells the OpenVPN software to route my home network traffic actually to the home network. For example, the 192.168.x.x number for a networked security cam should be routed to the home network...and to make networking easier, I have my home non routeable IP address to a hopefully offbeat number...

Anywho, because I am not home, I can't edit the server settings, but I can edit the client. So drumroll please...

...the missing line was

route 192.168.x.0 255.255.255.0

(where x is in the home network IP address...normally they default to "1" as in 'route 192.168.1.0 255.255.255.0' your mileage may vary)

I also have the line '--script-security 2', but I am not sure it is necessary for adding that command.

Now the correct way to do this would to have a 'push' command on the server, so as the client is logging in, this is automatically set (in case you change the numbers on the server at some point)

But this will work for me. I can access all my shared drives, and networked devices now.


As a side note, for some reason Win7 removed the popup bubble tool tips from the taskbar icons...the unintended consequences of that caused the OpenVPN context menu (right click on taskbar icon) to not pop up...that headache took a couple of hours by itself.

the registry setting that cause that is...

[HKEY_CURRENT_USER\Software\Microsoft\Windows\CurrentVersion\Explorer\Advanced]

"EnableBalloonTips"=dword:00000000

I simply deleted the setting, but apparently you can set it to "2".

Good luck!

Monday, August 27, 2012

A couple of projects, BaoFeng Dual band HT and FCD Convertor

The BaoFeng UV-5R HT is a dual band (70cm-2m) walkie talkie that can be bought new for under $50. Not many extras, but it is small and cheap. I should be getting one in the mail in the next few weeks. I will give my opinion at that time.

...a few weeks later...

The Baofeng radio is nice, small, works great...but  the programming is a serious pain...so I use the computer and even that has a bit of complexity to it...

Here are my instructions...


Second project is a FCD Convertor (sic) made by Tony CT1FFU (Antonio Matias). This connects to the RTL-FCD dongle radio to allow it to receive the HF bands. Now they sell them as completed items...mine was sent as a kit...so it will be a bit before I can test it...also now they have a version 4.1...mine is the 3.1...oh well timing is everything.

Stay tuned...

Friday, July 20, 2012

RTL-SDR usb dongle on Ubuntu

So a follow up...After I installed the software on my Win7 desktop...I decided to install it on my Dell Mini9 running Ubuntu. In the process I forgot why exactly I wanted to run the Linux version, but it had something to do with digital decoding software...

The reason I forgot the original motivation was because the most difficult part of the install was upgrading my version of Ubuntu.

I never upgraded past the 8.04LTS that came with the Mini9...I installed a newer version on my wife's but never updated mine.

So about 6 hours were spent in upgrading from 8.04 to 12.10...uh you can't upgrade...you have to reinstall new...

I had to create a boot USB using pendrive linux. Then I had to install 12.10 over top the 8.04...of course mine is a triple boot with OSX, WinXP, and Ubuntu, so I had to install everything into the correct directory...I won't get into the whole thing, but I had to go through the entire install process twice...the good news it it actually maintained some files I had in the Ubuntu partition.

So on to the RTL-SDR setup.

I followed this 3 page guide. I worked perfectly but it took quite a bit longer than advertised. (my mini9 isn't so powerful)

I usually give some addendum or notes on how my install went different...but actually mine went exactly the same.

What can I say it works perfectly...and on a low power mini9!

Tuesday, July 17, 2012

Software Defined Radio RTL-SDR usb dongle with HDSDR (updated for 820T)

Big Note:  This post was written for the older e4000 device...the newer 820T device uses a newer driver and installer
...download here!
...skip to bottom of this page for all new and improved steps...


Haven't been working on many projects...or should I say haven't been successful on many projects lately...

But about a month ago I heard about the $20 USB software defined radio...

Lets back up a bit. SDR or Software Defined Radio is easy to define but hard to explain. SDR means software running on a computer is the front end of your radio (controls, display, sound). There is some hardware involved but it is simply a box hooked up to your radio via USB, to an antenna and to power...no controls on it at all other than maybe a power switch.

Most people define SDR by the beautiful 'waterfall' displays they have seen.


But really SDR just means everything is controlled, manipulated, viewed, and heard on a computer.

BTW in that picture you see ALL the radio activity from about 162.0Mhz to 163.0Mhz simultaneously (but I am listening to 162.475 NOAA radio). So I can tune up large portions of a radio band and actually see where transmissions are taking place, then tune to those spots.

There are a few commercial SDRs out there with prices from about $500 to $2000 depending on what features you want...and obviously a receive only unit is cheaper than a TX/RX unit.

So what about this $20 USB dongle SDR?

Apparently there are some USB TV receivers running a Realtek 2832U chip that can be directed via software to receive from 60Mhz to 1.7Ghz. And originally they were selling for about $20...of course now they are a little bit harder to get...especially in the US, but still cheap.

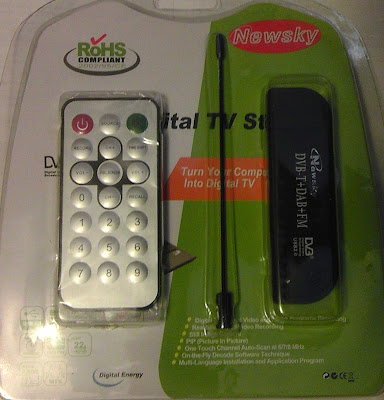
I picked up the "Newsky Mini Digital TV Stick" for about $35 including shipping from Hong Kong. (I used this one but there are many choices)


I actually just got it in the mail yesterday, and am running it right now.

The software setup wasn't that difficult, but too many options were available that created more chaos than necessary.

I will post the link to the instructions I followed, then put some clarifications in.

https://www.thecraag.com/RTL-SDR_on_Windows

(Here are some more instructions...maybe these are better than mine?)

The first step in this includes everything you need. I did not realize the file also includes the HDSDR software...but it is not selected in the options when you run the file...so scroll down and select it.

It says put all the files in one directory...by default the HDSDR software wants to be in the HDSDR folder, so I recommend you chose "Program Files/HDSDR" as your initial installation folder.

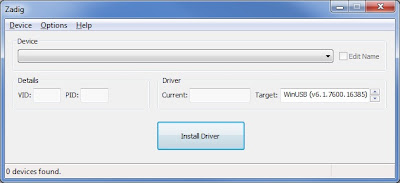
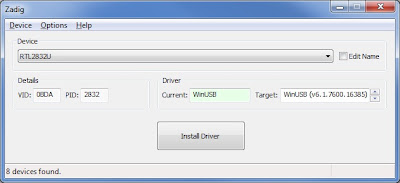
During the install process the Zadig program will run, that allows you to put a different driver into your USB tuner to allow the SDR software to work with it.

What they didn't say was Win7 automatically installed drivers for it so you find the hardware in a different manner...

The software starts like this, and since Win7 loaded a driver for the USB TV, there was nothing showing in the devices.
But I went to options, list all devices...And now a list of USB devices WITH drivers showed up. I chose the RTL2832U and for "Target" the WinUSB driver.


Back to the original instructions...I did not download the updated "librtl2832++.dll" file...and that created much chaos on my system...so simply do it.

Now that you have done all that, start up HDSDR. Mine automatically opened up the ExtIO window, I didn't have to chose any thing (the directions say select ExIO_USRP.dll ...no idea what that is, it was not an option for me).

So the ExtIO window for my setup is below...initially the window is mostly blank...you need to type in "RTL tuner=e4k" (minus the quotes) in the 'Device hint:' window and click on 'Create'. Then if all went well during your install you will get a window filled out like below. (if not close out HDSDR, unplug the USB TV and plug it back in, you shouldn't need to change anything else)

BTW, I mentioned that I did not initially put in the updated librtl2832++dll drivers and I got errors at this screen when I tried to type in the RTL tuner=e4k


I just put up this shot to show how you would select USRP.

Next I will have to load up a fldigi type program and try to decode some data...


Update: Sep 2013                                                                                                                               

 I had been reading about a newer version of the RTL-SDR hardware.

The one I used up till now was a RTL2832 with the 4000e chip in it.

I just got the NooElec RTL2832 with the 820T chip in it. (if you pop it apart, you can read the number).  The 820t is supposed to have better filtering, and lower freq available...and better reception.

I plugged it in, used the latest  Zadig driver installation...and at the same time downloaded the latest HDSDR software.  I renamed the old HDSDR folder so that the new install would be in its own folder.  Only additional step was downloading ExtIO_RTL.dll as linked here at the bottom of the page. 'RTLSDR (DVB-T/DAB with RTL2832)' and putting it in the HDSDR folder...much easier...

Summary of new steps.

1. Use Zadig to install WinUSB to “Bulk-In, Interface (Interface 0)”

2. Download and run HDSDR installation.

3. Download ExtIIO_RTL.dll and place in HDSDR folder.

4. Enjoy.