Summary is if you get a TP-Link MR3040 battery powered wireless router (the size of an iPhone 4) put DD-WRT on it with some custom software, plug in your DSLR, drop an app on your mobile device, you can get live photo feeds, or actually control the camera.
The BIG UPDATE is how you actually install the software to the router...previously it involved doing quite a bit of command line editing through the router...just a pain.
NOW it involves a couple of firmware updates on the router, first using the router's web based interface, then after the first update, using DD-WRT's web based interface.
Here is the German article I used (via Google Translate)...I will edit it for clarity.
http://www.fotopxl.de/blog/wlan-router-dslrdashboard-shuttersnitch.html
Below is the cut and paste from that webpage, with my editing of the instructions for clarity.
This assumes a default install of the TP-Link software.
instructions
- Download ar71xx.zip http://www.fotopxl.de/download/ar71xx.zip
- Unzip file, you will have 5 items the md5sums, and two V1 firmwares, two V2 firmwares
- Use external power supply and battery to power TP-Link during this update.
- Connect the TP-Link with a network cable to your computer
- If your computer has DHCP set on network, you can immediately log in...if not change your computers IP address to 192.168.0.100, and default gateway to 192.168.0.1
- Log into TP-Link using default login admin/admin at address 192.168.0.1
- Go to Update Firmware
- Now select one of the previous downloaded firmwares... choose the correct version and "-factory" In my case it was openwrt-ar71xx-generic-tl-mr3040-v2-squashfs-factory.bin
- After the install, the router will reboot...now it will be default DD-WRT and router will have 192.168.1.1 So change your computer address accordingly.
- Log into 192.168.1.1 default login root/root
- this is a good time to change the password.
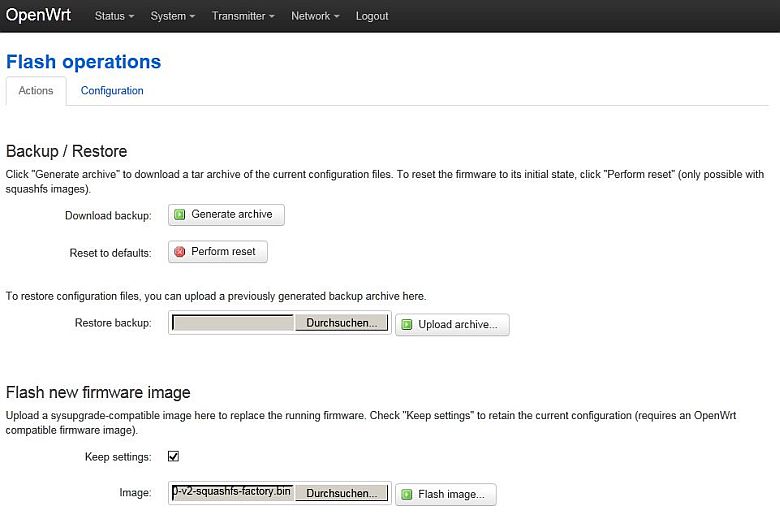
- Now go to firmware update http://www.fotopxl.de/images/blog/anleitungen/flash-image.jpg
- here you can still backup from the current state to make "Generate archive"
- Right now DD-WRT is running in default mode...so choose the other firmware the one that ends in "-sysupgrade" openwrt-ar71xx-generic-tl-mr3040-v2-squashfs-sysupgrade.bin
- Now go back to the browser and selects "flash new firmware image" file above and click "Flash image" (see picture)
- follow the installation instructions
- It will reboot again, the browser should refresh automatically
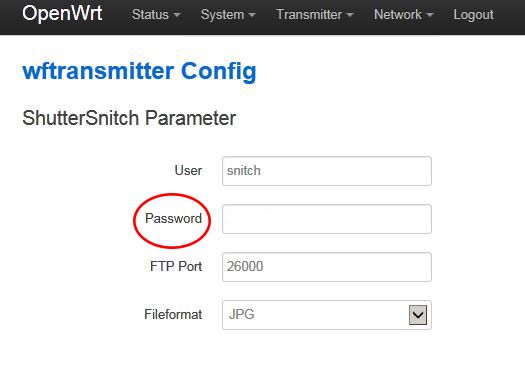
- now there is a new tab "Transmitter" including finds her "WFT-Config"
- Here you have to still your password ShutterSnitch enter (see picture) , you should still do not have one, then now defines one and then give this at ShutterSnitch "Options" Change "password / create" a. This is the same password for your superuser ShutterSnitch.
Done! In order to use both programs, you must use the switch on the right side and adjust the position, which is required for the program.
3G / 4G = nothing
WISP = wf-transmitter (ShutterSnitch)
AP = ddserver (DslrDashboard)
WISP = wf-transmitter (ShutterSnitch)
AP = ddserver (DslrDashboard)
Thus, you can switch between the programs and use both. Thank you for the excellent work.
That is much easier than the old way...On my Canon 60D I have ShutterSnitch working...but haven't yet gotten DSLRDashboard to work.


3 comments:
whenever I read one of these from you, I think this. http://xkcd.com/1742/
Truth is stranger than fiction
I write this blog specifically to document some of these projects...so that future me has a reference to refer to...this post is a perfect example...I went to my old write up to get it working again...and in the process found a newer easier way to do it.
Post a Comment