Thursday, December 26, 2013

iPad printing on older networked printers with Win7 and AirPrint.

Merry Christmas and Happy New Year!

I have had an iPad 2 for a while supplied by my company for work...I never really needed to print anything, so I never bothered to pursue the issue.

However I gave my wife an iPad Air for Christmas...so that pretty much means I needed to figure out how to print from the iPad.

I don't have new AirPrint compatible printers.

I have printers networked over the ethernet.

I tried a few apps, one saw the printer, but wouldn't print.

So much websurfing later I read about using AirPrint with a computer to supply the iPad with an ability to print.

There are a few writups on this, didn't work for me...but I finally found this writup

Don't be scared away, I used this on my Win7 machine to let the iPads running iOS7 to print.  (the date of the article goes back to 2010 and talks about iOS4)


The download link on that page give you a ZIP file named  Windows_AirPrint_Installer_iOS_5_for_x86_x64 

Trust me, it works on iOS7

Inside the file you get two folders, on has the Windows AirPrint etc name,  Inside that folder are 4 files, a readme, an exe, and 2 registry edits.

PREPARATION STEP:

On this computer I had to share the networked printers...I won't get into that here, but assuming you already have something shared, you simply have to find the printer properties that shows the sharing tab and enable sharing...if you don't already have something shared, then there will be a few more steps involved...

Now assuming your printers are shared, we can start.

STEP 1:

Run "AirPrint_Installer.exe" and then click on "Install AirPrint Service"...Run as Administrator!
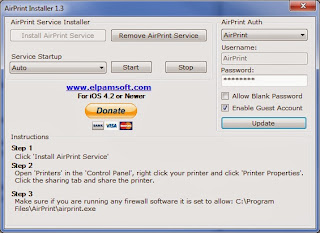


You will note that the "Install AirPrint Service" is ghosted in this picture...because it is already installed.

I recommend at this point, mouse over to the AirPrint Auth and select AirPrint, and some password, and Update...more on this later...

STEP 2:

Run the "AirPrint iOS 5 FIX - 32Bit.reg" or  "AirPrint iOS 5 FIX - 64Bit.reg" to install the iOS 5 fix  (Choose the correct file for you operating system, 32 Bit or 64 Bit Windows).  (I don't remember if I needed to be Administrator for this)


STEP3:

Now, make sure the AirPrint Installer window shows the "Service Startup" as "Auto" Then click Start, you may see a green box around "Start" after you click it...(if the next steps don't work, then reboot your computer now)


STEPS4-...

Most apps on the iPad have the ability to print.  For example with Mail. Looks something like this...


 Obviously select "Print"

And you get this menu...


If you already have a printer selected, it will show it instead of "Select Printer"


It immediately shows the available printers...once you select the one you want, a username password prompt will pop up.


Once you enter the info and it accepts it, it will keep it stored, so you don't have to log in again...

However it only stores that printer with that app...you will have to do it with every combination of apps and printers until you have selected them all once...good news is you don't have to print to set them up.


 Once you have the printer selected, and it shows on the previous menu...just hit print.


 Works well for the Color printer and the B&W.


NJOI


Wednesday, November 6, 2013

Untethered Jailbreak iPhone 4S iOS 6.1.2

You can look back through this blog at the variety of Jailbreaks I have done, iPod, iPhone 3GS a few times...

Each time, the technology of the Jailbreak improves, and seems to get easier.

Well this time was ridiculously easy!

(now I didn't have to unlock the phone...Sprint already did that for me...so I didn't have to worry about radio etc).

I will drop a couple of links here.. the instructions I found with a link to the Evasi0n downloads.

The video on that first link shows how easy it is.

I removed the passcode lock on my phone, did an iTunes unencrypted backup, ran the Evasi0n software and followed the instructions.

One weird part is about 3/4 of the way through the install, the installer tells you to tap the Jailbreak icon on your phone once.

...I didn't read that carefully enough, and was attempting to click on the ghosted Jailbreak button on the installer...till I re-read that instruction...no big deal.

After a few minutes it was done and all my settings were unchanged!

Unfortunately there are (as of this posting) there are no untethered Jailbreaks for the 4S at any higher iOS level...so if you have upgraded above 6.1.2...you are not going to have a good time.


Now the reason I wanted to jailbreak this phone was to install a tethering app...

Tuesday, September 10, 2013

ADS-B on Win7 with RTL-SDR --RTL1090 adsbSCOPE

(Note: I wrote this while I was using the 4000e version USB tuner stick I had originally used for SDR.   I just got an 820T version, and other than using a newer version of Zadig, I did not change anything in my installation to use it, the software explaned in this post still works without any changes...and reception improved.


For completeness sake, I thought I would throw on the Win7 version of this...using the PC as receiver and decoder.

(here is my original blog entry on the USB stick and Win7)

Some info was here...but not complete.

Again the adsbSCOPE software is here.

RTL1090 Software Download from here.(a little way down the page)  I got the German web site the first time...your mileage may vary.

When you unzip the contents and view the readme, you might get confused.

If you have already been using the RTL-SDR dongle on that computer (like I did) then just do these steps.

1 -Download this file http://sdr.osmocom.org/trac/raw-attachment/wiki/rtl-sdr/RelWithDebInfo.zip

2 -Unzip

3 -Dig through the folders "rtl-sdr-release\x32\" (assuming a 32 bit OS...I haven't tried the 64bit)
     and copy the following files to your RTL1090 unzip folder location.
      -rtlsdr.dll,
      -msvcr100.dll and
      -libusb-1.0.dll

4 -Now your RTL1090 folder should have (at least) the following files...
  -rtl1090.exe
  -libusb-1.0.dll
  -msvcr100.dll
  -rtlsdr.dll

5 - Stick in the USB, launch the RTL1090.exe program, and hit start.
     it shouldn't give any errors, just data...if errors, then probably you haven't used the dongle in that   USB port before...you need to install the rtl-sdr drivers.

if it works, then launch adsbSCOPE.

The only setting is in the Network area (like the previous topic) click the button labled RTL1090, and the button labled LOCAL.

Thats it, enable the client, and you should get data.


This screen shot shows the RTL1090 running, with the adsbSCOPE in the background...you can keep RTL1090 in the background normally...

...NY airspace is busy!

Raspberry Pi wth RTL-SDR receiving ADS-B aircraft data

One of the more interesting finds in the last few years was that aircraft were transmitting telemetry in the clear...apparently through the mode S transponder.

In the last year people wrote software to capture and decode this info.

Within the last year an ability to capture the data with an RTL-SDR TV on a stick was created.

I am not sure of the actual history or lineage...


I am using Dump1090 on the Pi written in Dec 2012 by Salvatore Sanfilippo.

The usage ..cd to the Dump1090 directory then
 ./dump1090 --interactive --net
is on his page...but installation I got from here.

I found more Dump1090 usage info here.

./dump1090  --interactive  --net  --net-beast  --net-ro-port 31001

That last ./dump1090 command breaks down like this...

--interactive =puts raw display on Pi with received data in columns.

--net            =tells Dump1090 to act as data server

--net-beast  =says output data in 'beast' format (adsbSCOPE can decode beast)

--net-ro-port 31001 = sets the output port at 31001 to match what adsbSCOPE is looking for

I am trying to use adsbSCOPE (on a networked windows computer) to decode the data and plot it...but not sure why it isn't working...

So far I AM getting limited acft info on the Pi...but nothing is being seen by adsbSCOPE...

...of course I look away for a few minutes, and adsbSCOPE is working now...but seems to be a bit of lag from when it shows on the Pi till it shows on adsbSCOPE.


The two screen shots were taken within seconds of each other, and show different data...the adsbSCOPE keeps data on longer...Dump1090 only displays data it is currently receiving.

Also, sometimes the LAT/LON shows up on the Dump1090 display...I don't know why it didn't here...unless it received the position data early, and I didn't see it before it went away.

Here is how I setup adsbSCOPE

1- since I am using a Raspberry Pi in this case to capture the data...I don't need any of the other software that comes with the adsb_all.zip file from here.

The actual file is multiple folders deep...

(unzipped folder location)...\adsb_all\pc_software\adsbscope\26\adsbscope26_256.exe

Obviously make a desktop link for ease of use...

Only a couple of settings to make it work with the Pi as I set up previously...

First, Network setup (BTW, you can't set it up while the RAW-data Client is active as shown)


I clicked on the BEAST default, put the Pi IP address in the URL, and make sure the port was 31001.
Then "CLOSE" (on mine I have to drag the window larger to see the CLOSE button)


 Now for the decoder select Beast.


Finally NOW select "RAW-data Client active" on the 'other-Network' menu.

So far working great with the stock antenna near a window!

Yes, you don't need a Pi to do this...you can plug the RTL-SDR stick into your PC and do it all there...but what fun is that?


Addendum:

I found on this web page a command for starting a Dump1090 webserver...I haven't tried it yet...

  ./dump1090 --gain -100 --net --net-ro-port 31001 --net-http-port 8080


Obviously you access that from a different computer.

Monday, September 9, 2013

RTL-SDR on the Raspberry Pi

Disclaimer...so far the Pi does not have enough horsepower to run the typical SDR linux software...so for now don't expect waterfall displays etc.

But the Pi WILL see the TV USB dongle I use, and the RTL software does run...

I will list the links and steps I used to get the hardware/software running...


...time passes...


There seem to be 3/4 projects along this subject (that I am interested in anyway))

(1/2)First two involve using the rtl_fm software...one runs the a server and audio etc is decoded on a client, the other involves actually tuning in and listening to audio on the Pi.

(3)Next one uses the rtl software and multimon to decode data...like APRS messages.

(4)Last one uses the rtl software and some other software to receive ADS-B aircraft transponder data.


So far the last one is working suprisingly well.  The first one seems to work, the second one is a nogo...and I lost the link I found that described #3.


It is interesting, it seems that the links I find on one computer are different than on another computer using the same search terms...so in the process I have lost some locations...that is what is delaying this blog entry...

...I will say, over the next week, I won't be playing with this stuff...but I will be able to research and organize the links.

I will probably break out the #1/#2 to a different section than #3/#4.  So consider this a top level article.


More to follow.

Sunday, September 8, 2013

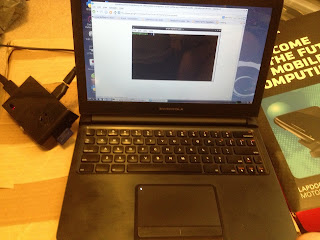
Raspberry Pi and Motorola Atrix Lapdock and...


To begin with, I am typing this blog entry on this setup!

Hopefully by now everyone has at least limited knowledge of the Raspberry Pi micro computer.

Here is some info if you haven't much knowledge on the subject.

Now some very clever people out there discovered some very useful features of a discontinued cellphone accessory, the Motorola Atrix 4G Lapdock.

The lapdock is a screen, keyboard, battery pack, USB hub in one nice ultraportable laptop case.  Specifically it has USB out for its hub, the keyboard and trackpad are on the hub.  The screen is a HDMI display.

Well guess what, the Pi has HDMI out, and USB plugs.  All you need are the correct connectors.


I used this blog to sort out what connectors I need.  I was able to find an ebayer that had all the parts I needed for a reasonable price (not a package, but one shipment from China).


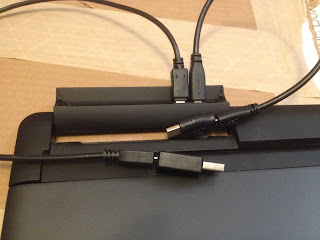
The Lapdock has male micro usb and HDMI plugs where the cellphone would dock in.  I picked up a 12" micro HDMI extension cable (male-female) and 12" micro USB extender.  I also picked up a microHDMI female to HDMI male adapter, and the same thing in a USB adapter.

USB 2.0 type A male to Micro USB B type 5pin female Connector Adapter convertor,
HDMI Male to Female Micro HDMI socket adapter convertor, 
50cm Micro USB 2.0 type 5Pin Male to micro USB Female tablet extension cable, 
HDMI 1.4 D type Micro HDMI Male to Micro HDMI Female M/F Extension Cable 30cm

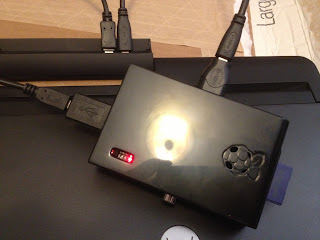
The Raspberry Pi has a micro USB power plug...but the latest version can take USB power through the normal USB ports also...and this allows the Pi access to the Lapdock hub/keyboard.

So with two wires, the Pi is powered and sends video/audio to the Lapdock.

I installed the Raspbian Wheezy (to be specific, I used the NOOBS file for installation) and it recognized all the hardware immediately.   The only thing that didn't work out the box was HDMI audio...but that is a simple edit...here.

sudo nano /boot/config.txt
  - uncomment the hdmi_drive=2 entry
  -save the edited file by using...

Press Control-x
Press y
Press [enter]


I will admit, I did the Raspbian installation using a standard keyboard/mouse, HDMI display (my cables weren't in yet)...but I didn't do any changes to the installation other than the audio edit to get the Pi to access the lapdock.

Now the why portion of this other than because it is there...

I intend to install RTL-SDR on it with my TV USB dongle and maybe GNU radio...

...for later...


Friday, September 6, 2013

Linksys WRT54G V2 w/ DD-WRT used as a Client Bridge

I have a few projects in progress, but I thought I would add my thoughts on this.

I spent all last evening, and most of today on and off trying to do this.


I received a defunct WRT54G Version 2.0, it wouldn't do it's router job properly with the linksys software, and was flakey anyway.

So it sat for a few months when it was replaced and then instead of going into the trash it was given to me.  If you read the reports, you know there were a lot of issues with some of these models...so I figured I would attempt loading DD-WRT on it, and maybe use it somewhere (actually looking at a HMSS-MESH setup...maybe later)

I won't retype all the well documented steps at DD-WRT I used to accomplish this...just point out some important (maybe hidden) items.

(1) First, flash the 54G with the DD-WRT firmware as annotated here.

- they mention a 30/30/30 reset...it is well explained here.

--1. DO A HARD RESET *BEFORE AND AFTER* YOU CHANGE DD-WRT FIRMWARE VERSIONS. This does not mean hitting the reset button and saying you are done. This means doing the 30-30-30 reset. To do a 30-30-30 reset you must push the reset button with your router powered on. Hold it for 30 seconds with the router powered on. STILL holding it, pull the power cord for 30 seconds. Still holding it, plug the power back into your router and continue to hold the reset button for 30 more seconds. You will have held the button for a full 90 seconds without releasing it.

 (2) Next install the preferred firmware as noted lower down the page on that last link...

--12548 is a good build for older G only routers.
ftp://dd-wrt.com/others/eko/V24_TNG/svn12548/

 --note that in the first (1) step, you installed a firmware named  dd-wrt.v24_mini_wrt54g.bin
---so download the firmware from the list in (2) that has "mini" in the name.

(3) Again, follow this link for updating the firmware...BTW it is called the 'Peacock Thread'.

(4) assuming everything is working properly, follow these directions.


I did all that, but want to add some info.

-I set up my network under 192.168.11.x  so I had to modify the instruction to use that...obvious, but people may miss that.
-At some point in the past, I set up my wireless network a WPA2-Mixed...apparently that is a bad idea...and caused my many hours of hair pulling...
--I changed it after I read this link...
-Avoid WPA2 Personal MIXED, as it will likely kill communication between the routers (see Security section below for more on this). WPA2 Personal is fine.
 ---it immediately started working after I changed to WPA2-Personal...not mixed...and use AES vs TKIP+AES.


The DD-WRT forums are full of info, but it is a bit hard to sift through, and the forums are very nice to the clueless (like me in this case)...but luckily the answers were all there.


Thursday, June 13, 2013

Kenwood D-710 backup battery change

Apparently the Kenwood D-710 APRS dual band transceiver has a back up battery for the clock.

Your memory and presets don't need it, but the clock on the display does...and probably it uses that clock for APRS time date stamps on reports.

At some point in the last few months mine died.  I didn't realize it until I noticed that the clock just showed blank lines

--:--

Then I went about trying to figure out where the battery was, what kind it was, etc.   Suprisingly harder to find out than you would expect for a replaceable item.


Long story short, I found some schematics and diagrams for the unit.  I searched for a battery and eventually found it.

It is a tiny rechargeable lithium battery mounted in the remote head.


Specifically it is a Sanyo ML614 battery, just a button cell, no solder leads (both kinds are available).


 It isn't something you will probably find locally, I found it online at a few electronics supply stores, and with shipping they were all around $8.   I ordered mine from Radio Shack.


Wednesday, June 12, 2013

Fix your Netgear Wall Wart Power Supply (switch, router, etc)

This is the second Netgear wall wart that has failed on me...and probably my 6th or 7th wall wart total.

Even though it is under warrantee...Netgear wants you to spend money to get it replaced.

They are willing to send you one for $20, or you can mail yours and eventually get one back (that is what I did with my previous one)...shipping cost about $4, for a really poorly built power supply.

All that is inside the plastic box is 4 diodes for a full wave rectifier bridge, and a cap connected to the step down transformer, no voltage regulation...at best it cost them a buck to build.

So when the 'customer service' person told me he would take care of it right away...just needed my credit card...I said forget it, I will buy another piece of junk from the dollar store first.

That is when I decided to pop it open.


Not impressed.

This was the offending part, a bulging capacitor (hard to see but the top is bulged a bit.


Radio Shack only had axial lead in this size 2200uf 35v (original was a 25v, close enough)


So a bit of heat shrink tubing solved that issue...and for a few bucks it was back up and running.

Tuesday, April 9, 2013

Just got a iPhone 4S...but what do I really want in a cellphone?


I have owned cellphones since around 1992 (bag phone through Cellular One)...ever since my wife drove home in a snowstorm.

Obviously the cellphone has changed, also (somewhat) my needs in a cellphone have changed.

First one was strictly for emergencies...it was SOOO expensive, roaming fee per call was $2, and all calls were about $0.6 per minute.  But better than having your life in jeopardy.

Time changed and just a couple of years later the mini cell towers emerged with the smaller phones required.

Our next phone (~1994) was a Nokia on the At&t network (they bought out Cellular One).  It was pretty handy and slightly cheaper to use...but still just for emergencies.

A few years after that, Sprint emerged and started to spread it's all digital system throughout the country (~1997)..and they had a great deal with 2 phones sharing minutes and cheaper fees yet.  With the free cell to cell service, we started using those phones quite a bit.

Not much changed for us and cellphones except the phones got smaller...until 2007 when the iPhone (1) was introduced.  Now all of a sudden smart phones appeared everywhere.

Since we still had, and still liked Sprint, we weren't getting an iPhone...but HTC introduced it's touchscreen smartphone...the HTC Touch at the same time the iPhone was introduced.  (only through At&t)

The Touch wasn't as good as the iPhone, but it ran Windows Mobile, and in those days, nothing was compatible with Windows except for it. ie, syncing calendars emails and contacts...and I used Windows at work.

So we stayed with Sprint, and I got the Touch.  It was an ok phone, it did what I wanted, but really slow response...and kinda crummy screen.  However it had the best voice dial I have used up to now...even in my noisy pickup I could voice dial contacts or numbers.

That version of WM had limitations, and so did the phone so a year or so later I picked up a HTC Touch Pro II considered a pocket PC and running WM6.5.  It was a marvelous phone, and very capable.  I happily used it till it died in 2011 (it got to the point where it would be unable to find a cell tower unless I did a hard reboot -back to factory defaults-...a weekly occurrence).

When that phone died I had to get a replacement, Sprint didn't have the iPhone yet, so I settled for what I thought would be a nice phone, the HTC Evo3D. (and picked up a 2 year lock-in)

I couldn't care less about the 3D camera part, but the rest of the phone seemed fine.

Of course when I started to used it, I found the weaknesses...

And that brings us to the title of this entry...what do I really want in a cellphone.

#1 - Make and receive calls.  Every phone I owned till the Evo3D was easy to answer even if the lock screen was on, and easy to hang up after a call was done...not the Evo3D.

#2 - Since they are smart phones, I want to easily see my upcoming appointments...even if the lock screen is on...TP2 did this well, Evo3D does this only with 3rd party widgets, and even then, poorly.  The photo at the top shows my last 3 phones with stock lockscreen on...

#3 - Since text has grown by leaps and bounds, I want to be able to read a text without unlocking the phone...didn't text with TP2, but received texts showed on lockscreen...more widgets with the Evo3D.

#4 - Will work when I need it to work.  TP2 was a rockstar until its last few months...Evo3D luckily has a removable battery ...because about once a month or more I have to pull the battery to bring it back to life.


Well, finally the lock-in expired, and I could get another contract phone through Sprint.

I had been doing my homework since before my TP2 died on iPhones.  I got a 3GS from a buddy, who was going the android route.

 (I have blogged about that phone a lot here...having to do with international calling and jailbreaks and unlocks)

So I know how they operate, and lets face it, they do what they do very well, and very reliably.

But owning that Evo3D really identified what I wanted in a phone, the TP2 did much of it, but the iPhone does it better.  If you read my blogs, you know that I am by no means a fanboy, but I give credit where it is due, and the iPhone is a polished product.

So why did I get a 4S, and not a 5?

For one, I didn't want to spend ANOTHER $200 on a phone.  But my TP2 was $125 used, and the Evo3D was $150 on contract (and they lowered the contract price to $50 about 2 months after I got mine...d'oh)..so $200 isn't out of the realm for what I had spent on phones.

For me, I like the 4S form factor, I already have a bunch of 30 pin connectors, thanks to an iPod, the 3GS, and a company provided iPad.

Speed wise, the 3GS was pretty speedy compared to the iPod2, the 4S is speedy compared to the 3GS...both are speedy compared to my previous phones.

The iPhone 4S added Siri, and I mentioned that the Touch had the best voice dialing I had ever used...

...from what I have seen so far, the iPhone Siri is equal to slightly better...I haven't tried anything other than calling contacts so far, but in my noisy truck it was as good as the Touch.


...btw, I will be jailbreaking it soon...but on a side note, apparently it is already unlocked for international use...we will see.

Thursday, February 28, 2013

Here is the Pebble watch!

I joined this Kickstarter project not too long after it was posted.

The Pebble watch is an extension of your smartphone using an e-paper display, and bluetooth for connectivity with your phone.

I wanted one because when I go running (or really any workout) I put the phone in a case strapped to my arm, with my headphones plugged in.  I can't see the display or control the device from there...but it is out of the way and secure.

The obvious problem with that is if I get a call, if I answer with the remote, I can't screen the calls.  If I get a text etc, I will miss it.

So I really wanted some way to view what was going on with the phone, via a watch.  About a year after I decided I needed that, the Pebble watch Kickstarter project was released.

For those not familiar with Kickstarter, it is a way for an entrepreneur to get funding for a project...donations range from a small donation, to buying a finished product.


So the Pebble group came up with a (not smart) watch that was exactly what I was looking for.

For more info about that you can visit Kickstarter or the Pebble folks.

Pebble Kickstarter Video from Pebble Technology on Vimeo.

There has been some complaints from other owners, but I don't have any.

I find the display extremely legible, the watch and band are a nice fit for my average size wrists.  (although I don't like plastic bands, so I will eventually swap that out)

There are a couple of areas for improvement, and as the software matures, I expect those items will be fixed.

I am currently using an Android phone which apparently is much more compatible than the iPhone, due to limitations of the iPhone itself.

(you can individually select email accounts...I left those out of the picture for privacy reasons)


You can have as many or as few announcements as you want, mine is set up to show caller ID (via contacts) for incoming calls, text messages, facebook messages, email from one account, and calender alerts.

There are some good videos out there demonstrating the device, so I will let you look for those, but here are some pictures.

     Backlight off                           Backlight on (wrist activated) 


Menu  (part)                                     Music control


So as is, it is just what I wanted, the caller ID, and message alerts are perfect (screen lights up with message, and the watch vibrates)

This is what I want to improve.

There is one submenu system with the different watch faces, music control, set alarm, and settings all together.

-the settings submenu has your airplane mode.

1. So what I want is to have all the watch faces within the settings.  Thereby cleaning up the first menu.

Next, only the upper left button does anything when the watch is showing...if a message pops up then the two big buttons on the right are used to scroll through the message.

2. So I want an easier way to get to the music controller.  The other items you will use once in a while, set it and leave it.  The music control is something that would be operated regularly (if at all).  Maybe the middle right button for the music control window, since the big buttons on the right select tracks, and the button on the right is the esc/back key.

3. Finally I want a different watch face...a dual time zone one...


Now there is supposed to be a SDK out to allow programming the watch face as well as app integration.  Users have only been getting their Pebbles in the last couple of weeks, so it will be a little while before third party apps show up.


My summary is, I am happy with my Pebble watch, and look forward to the software improvements.