I guess this is sort of part 2...part one had background and a bunch of links...this part will have a series of photos to set up the radio for APRS...next part will have some usage info.
You can easily do all the APRS setup just off the control head...but to store in memory your favorite channels; the software is a lifesaver.
As we go through the menus...If I don't list one, then I left it default.
Power it on, and you get your normal display. It doesn't matter which side you set up for APRS, but this one is setup for the A-side.
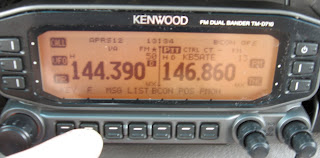
My finger is pointing at the
Function button. We will use it to get to the APRS submenu later. To the right of the row of buttons are the volume/squelch/select knobs for the individual side. So my inital step would be to push the left of the two knobs and select side A. (the PTT indicator will move to the left side). I would then push the first button above those two next to the TNC indicator. That will make the left side of the radio show a
D and
APRS12 (or it might say something else...will will check that in a bit.)
Now when I press the
F button, that row of labels changes.
And you see this.
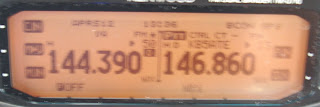
Notice the
F changed to
F OFF.(ha) So you could push the
F again and go back to the previous list.
Now when I push the big knob on the left, instead of cycling through the bands, I get a new menu.
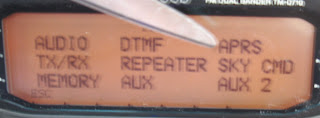
Now rotate the big knob on the left until the cursor flashes at
APRS. (the camera can't see the cursor, so the scissors will do.) Then push in on the knob to select the
APRS submenu.The next menu that pops up will be whatever you had up last. You rotate the big knob to cycle through the submenus (601,602,...etc)
601 is self explanatory...your callsign. I use the suffix -9 after my callsign for "mobile" on this radio, and -7 on my HT to indicate a D7A.
602 is the GPS setup menu.
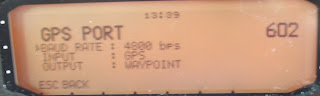
When you first get the radio, the
INPUT will probably be
NONE. So push in on the big knob again to move the cursor down to the next line...in this case BAUD RATE. Then rotate the big knob until you get to the
INPUT line...push the big knob again and the
NONE or
GPS will flash...rotate the knob again to change that input.
Then rotate again to select
OUTPUT, and change that to
WAYPOINT.
So understand how to get through the menus, rotate to cycle, push to select...when you are done you can select
BACK (using the other radio buttons) to move back one menu or
ESC to completely leave the menus. For now, you will want to use
BACK as we edit the menus.
Next menu
603.
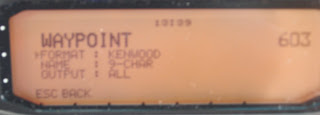
This one will be different if you don't use a Nuvi and GTRANS cable.. But these settings work properly for my Nuvi 350. You have to change the first two for sure.
FORMAT is
KENWOODNAME is
9-CHARFor other GPS units, search the web.
Next menu
612.
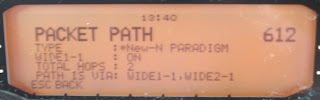
This is kind of neat. I won't get into the background of the settings...because I don't completely understand it all...but what you need to know is that you set everything on two settings.
WIDE 1-1 select
ONTOTAL HOPS select
2 (you can select
3 if you are in a very remote location, but try
2 first.)
The radio automatically fills in the Path for you.
Next menu is
624.
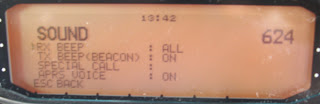
Sound is up to the user...I just wanted to point out the settings. You can turn off the beep when your beacon transmits, you can select when to beep when an APRS message occurs. If it beeps too much for you, then start changing settings.
Next menu
625.
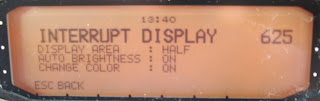
Ok, this bugged me until I could find the menu. The default pop up for APRS info is fullscreen...I didn't like that...because you lose view of the frequencies on both sides.
So I dug through the menus until I found this one. Mine is now set up so that the routine APRS info pops up only in the A-side of the radio (note to self, try to take a picture of that). An actual message from someone to you pops up full screen...so you can read it.
You can also chose NONE.
DISPLAY AREA : HALFAPRS is now setup on your Kenwood to use the Nuvi. I just want to point out one more menu.
Under the
AUX at the main menu (one prior to
APRS).
From
AUX, go to menu
529.
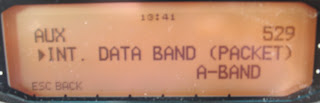
There is nothing to change here. I just want to show that if you have the A-side setup for APRS it will show this
INTernal
DATA BAND A-BANDThere is another PACKET radio setting that will also show the
EXTernal band
B-BAND.
That is normal if you set it up like mine.
There you go, a picture is worth a thousand text files. Next up, usage.


