I am not a purist...I run a few different operating systems and a variety of Email clients and web browsers...depending on the OS and my attitude.
At home, my main websurfing/email computer is running Ubuntu with Evolution for email/calendar and Firefox for browsing.
My home 'work' computer (ok gaming and video editing) doesn't have email and I have Chrome and Firefox primarily for browsing.
My travel netbook triple boots OSX, WinXP, and Ubuntu...and mostly I run OSX on it and browse with Firefox or Safari.
I have a work/gaming laptop that I have if I will be at a location for a few days (like NY this week). I run Win7 on it, Chrome, Firefox, and until now standard Windows Live Mail.
Of the different email clients I have used, I actually like OSX's the best. Simple, keeps accounts in different folders, easy to see if an account has new messages etc. I wish I could get that client on windows.
Today I had it up to here (hand above head) with Windows Live Mail bloatware...I mentioned before how I liked Win7 but hate the email client...well today I did something about it.
I searched the internets...
I found the top choice from a somewhat unscientific study in a popular website (I lost the link) was Mozilla's Thunderbird.
I had tried it on Ubuntu and didn't like it...but I thought I would try it on Win7.
I will have to say that it is now my favorite Windows email client...still not as nice as OSX's but close enough. Speedy, lightweight, and not too hard to import from Windows Live Mail.
A couple of things. I couldn't get it to import emails (and I tried a couple of plugins) but it ended up that I didn't need to jump through those hoops...a number of years ago I started leaving ALL emails on the server (gmail and my own) for a backup.
Thunderbird WOULD import the settings from Windows Live Mail...all my various email accounts were imported with one click.
I actually don't have any address books on my notebooks (just my phone) so I don't know how that works.
So it ended up that I didn't need to import my email...using IMAP settings, it quickly downloaded all the headers etc.
The only thing I needed to change was the order of the accounts...I needed a plug-in for that...so I used Folderpane Tools.
Thursday, December 23, 2010
Monday, December 6, 2010
HTPC - Home Theater PC - part2
So I had some parts I liked, and software I liked...but it just wasn't working.
So I looked at the processor I was using...I knew I could play BD rips (MKV files) on my quad core machine easily with all sorts of other programs running in the background, so I thought a dual core could do the trick.
Unfortunately my choice of Small Form Factor computers (GX280) could not take a dual core...it already had all the processor it could hold.
So more checking specs I found that the Dell 745 SFF computer could take dual core processors in fact it could take the processor I had in my junk box every since I upgraded my main machine to a quad core.
So back to Ebay and waited till I found one at a cheap enough price, put my ATI HD4550 graphics card in it, loaded up XP Pro (it had the product key for it) then installed Win7.

Plugged in my Media Center Remote (MCE Remote) (another Ebay grab) and fired up XBMC.

Plugged it into my TV and started watching the BD rips. XBMC has a debugging setting that will show you how much processor power is being used...it never gets above 50%.
The MCE works fine out of the box with XBMC and is plug and play with Win7...but outside XBMC it will only work Windows Media Center...won't actually work in windows as a mouse.
So while wondering how to do it...I found this thread at The Green Button a Windows Media Center forum...and specifically the files linked in this blog The Digital lifestyle and the program RemoteKC. (The last link has the direct links to the Win7 compatible files)
Program is simple...one file is the executable, the other is the commands (.ahk file) . With this program (RemoteKC) your remote has three settings selected by pressing the * button on the remote- mouse mode, keyboard mode, suspended. So in mouse mode, when you press the arrow keys on the remote, the cursor moves, OK is left click (and I haven't found right click yet). I haven't used keyboard mode. But when you are running XBMC or WMC then you need to suspend the RemoteKC...that is what the suspend mode is...now the remote acts like a MCE remote.
So, right now, everything works as I hoped it would!
So I looked at the processor I was using...I knew I could play BD rips (MKV files) on my quad core machine easily with all sorts of other programs running in the background, so I thought a dual core could do the trick.
Unfortunately my choice of Small Form Factor computers (GX280) could not take a dual core...it already had all the processor it could hold.
So more checking specs I found that the Dell 745 SFF computer could take dual core processors in fact it could take the processor I had in my junk box every since I upgraded my main machine to a quad core.

So back to Ebay and waited till I found one at a cheap enough price, put my ATI HD4550 graphics card in it, loaded up XP Pro (it had the product key for it) then installed Win7.

Plugged in my Media Center Remote (MCE Remote) (another Ebay grab) and fired up XBMC.

Plugged it into my TV and started watching the BD rips. XBMC has a debugging setting that will show you how much processor power is being used...it never gets above 50%.
The MCE works fine out of the box with XBMC and is plug and play with Win7...but outside XBMC it will only work Windows Media Center...won't actually work in windows as a mouse.
So while wondering how to do it...I found this thread at The Green Button a Windows Media Center forum...and specifically the files linked in this blog The Digital lifestyle and the program RemoteKC. (The last link has the direct links to the Win7 compatible files)
Program is simple...one file is the executable, the other is the commands (.ahk file) . With this program (RemoteKC) your remote has three settings selected by pressing the * button on the remote- mouse mode, keyboard mode, suspended. So in mouse mode, when you press the arrow keys on the remote, the cursor moves, OK is left click (and I haven't found right click yet). I haven't used keyboard mode. But when you are running XBMC or WMC then you need to suspend the RemoteKC...that is what the suspend mode is...now the remote acts like a MCE remote.
So, right now, everything works as I hoped it would!
Saturday, November 27, 2010
WiFi cellphone, Boingo, and WMWifirouter
Boingo has a mobile device plan for $8 a month (world wide coverage). I travel a LOT so a cheap data plan is very useful. Their mobile laptop plan is a couple more $ a month.
My cellphone does wifi, and there is a Boingo plugin for it...there is an app for my iPod, but that one doesn't see the same networks my phone sees for some reason.
Well there is another program for my windows wifi phone...WMWifirouter. This program allows my phone to share wifi over USB (and other combinations). $20 (15 EUR)
So right now I am in Brussles, using my Boingo account, tethering my laptop via USB...so my phone battery charges. The hotel I am staying in (that Boingo works through) charges 10 EUR a day for this connection...more than paid for my monthly fee with this one connection.
Cheers
Sunday, November 14, 2010
Ubuntu update oddness.
I do the usual updates with Ubuntu...but for some reason a recent update deleted my printers.
I tried to reinstall the Brother HL-2070N (which is a great cheap laser printer!) the way I always did...find it on the network, and install a earlier printer driver that Ubuntu already had.
Well that didn't work this time, so I had to search the internets...but luckily the fix was easy...relative for Linux...
First found this Tutorial (FAQ/Wiki?) at help.ubuntu.com.
That directed me to the Brother website, that I still had to wade through a bit to find this page, which directed me to these drivers and this page of directions.
The Ubuntu site's directions were the same as Brother's site...but Brother added a test command to make sure the drivers installed properly.
So now that the drivers (lpr and cups) were installed, I now had to go the the list of printers, and point the 2070N to the actual network location (properties).
And it works again...but I would like to know why it failed to begin with.
Thursday, November 11, 2010
Some interesting Amateur radio links.
Doing some more SDR (Software Defined Radio) research and found some interesting links.
First is WebSDR.org. A list of SDR systems online...i.e. you can use via internet. The first one I went to is pretty amazing. WB4MAK.com seems to give full control of the radio to a nice Java interface...waterfall displays etc...you have to see it to believe it.
Next I found the SDR Monitoring System...listing the status of online SDR sets displayed on a Google map...I don't know if it has ever been updated, but the concept is neat.
Next is the VHF Propagation Maps, where APRS data is used to determine the propagation (range) of VHF and some HF sets...displayed on a map.
Texas VHF is a site of info and links for Texas based, and other Amateur radio.
Ham Radio University is an event on Long Island in January...I will have to see if my schedule will let me attend.
The SDR radio sites make me REALLY want to invest in this technology...
Sunday, November 7, 2010
HTPC - Home Theater PC
I have been running two modified XBoxes (original ones) as HTPCs for quite a few years now. It required a hardware hack that has been thoroughly documented on the Internets.
For the software part of the HTPCs I was (am) running XBMC - XBox Media Center. Let me just say that it works great, nice interface (that uses the XBox remote) and runs pretty much all media files (even DVDs as .ISO files) as well as most online media sources (YouTube, internet radio).
There are only a couple of drawbacks right now, no Hulu or Netflix support, and no ability to play Blu-ray disks, or files, or .ISOs.
Right now most of my most played media is stored in a NAS (or two). But recently I have been playing with Blu-ray disks. My BD player takes (it seems) forever to boot and load a disk, so if I want to watch a BD disk, I had better plan on putting in the time. And although the BD player has online media access (youtube) it is slow and clumsy.
So I started ripping BD disks. I am still experimenting with file type, so I use AnyDVD (hd) to rip an ISO, and I use MakeMKV to rip into both MKV files, and to rip the disk into a backup. I have the files (because I save the ISOs and other files, about 100gigs a BD disk) on a Buffalo Linkstation with a 2TB USB drive plugged in. I needed the space, and I wondered if this setup had enough throughput to stream the HD video.
First test was on my main gaming Win7 machine...VLC played the MKV files just fine...but not the ISO.
My Linux machine would not play anything back, even with VLC.
Meanwhile I had picked up a Dell Optiplex GX280 SFF (small form factor) computer (3Ghz P4), and put in a ATI HD 4550 SFF video card. (has the HDMI out). So I thought I would see if this little machine could play back the BD files.
The answer is yes...although at first I had a lot of trouble...VLC on that machine (winXP) stuttered on playback...so I installed Media Player Classic HD (MPC-HD) and that played better but at 100% CPU and still a bit of stutter at times...then I looked at task manager to see what was running...
The person I got the PC from had installed Windows Security Center (or something like that) an all inclusive antivirus, firewall, malware etc blocker...unfortunately it used a ton of processor power any time you did anything else with the computer...so I turned it off, and suddenly BD playback was just fine. I uninstalled that, and installed Avast! antivirus (regular windows firewall was still there).
So ok I can play back these files on a windows machine...but was there a better interface?
That brought me back to XBMC. Now they have versions for all the OS platforms and a Live CD version. So I tried out the Live CD.
I had to boot the Optiplex hooked up to the PC monitor and the HDTV and use the ATI software to correctly use the HDTV as output device on windows...but after that it worked fine on windows.
Booting from the Live CD was fairly quick. Once XBMC had booted, I had to go into the settings and put the audio outputs to HDMI...and I had to play with the video rendering option...autodetect did not work on any media playback.
But BD playback was a no go using the Live CD.
So I installed the windows version. Again I had to set the audio output, but some of the other options were different than the Live CD. This version could play back the BD files...but it was choppy.
So I needed to be able to use MPC-HD to play back the BD files...and I needed XBMC to use that program to do the job.
A workaround that is pretty good is this on MediaSmartServer.net.
Create a file named playercorefactory.xml and place it in your [user]appdata/XBMC directory.
The location depends on what version of Windows you are using, and the location of the "mpc-hc.exe" file also depends on version.
I personally removed the -filename=".*1080p.*" rule...because none of my BD files have that in the title.
It now works pretty well, XBMC starts mpc-hc when it finds the MKV files (BD) and pops back up when playback is over.
Only weird part is, if I stop the BD playback...I have to tell mpc-hc to exit.
So until I find a better option...this setup will be my new HTPC.
Wednesday, November 3, 2010
APRS and the Kenwood TH-D7A(G)
The Kenwood TH-D7A(G) was the last release of their TNC/APRS loaded dual-band HT (handheld).
I will have to go into my notes to see if I wrote about using it for APRS...but the summary is, I have the D7A hooked up through a Argent GTrans cable to a Garmin Nuvi350. It works great...but the Nuvi has to be plugged in for it to work in this setup.
For some reason I had thought that the Nuvi and StreetPilot GPS units were the only Garmin units that could not only send GPS position to the Kenwood radio, but receive position information of other APRS units.
I was mistaken...looking at this capability table, you can see than a lot of Garmin units have the two way capability (in/out on the chart).
Now there are some advantages to the Nuvi 350...but it I want to use it strictly as a portable APRS unit...I will have to include an external battery...which will increase the weight and clumsiness of the unit.
I would like to have a GPS unit ON the HT so I can see the other positions right there, without any other wires and things.
I noted on that list that my Garmin GPS V (that is in a box in a closet) has the two way capability...but it is a bulky unit, and doesn't really fit my needs.
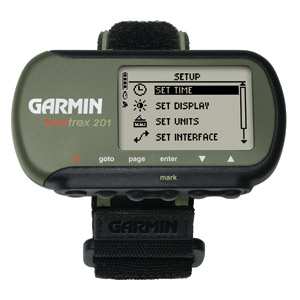
Then I found this web page from Steven Smith (WA8LMF) where he uses a wrist mountable Garmin ForeTrex 201 hooked up to a D7A.
So I am in the process of acquiring one, and will make some kind of mount so that it is part of the radio.
One caveat...after I found the 201 which uses a rechargeable battery and a snap on connector for the serial port...I found out that the 101 uses replaceable batteries, and has a serial connector on the side. So that one may be a better product for my purpose...but I will soon find out.
Sunday, October 24, 2010
Dual boot Mini 9 MBR failure...or the wife is pissed
So the wife brings her Mini9 running OSX to me telling me it just died. First it froze, she rebooted it and the black screen prompt showed a couple of errors and "Operating System Not Found"
Of course there are many ways to fix this, boot from your windows CD and say "repair", etc...but this is a dual boot OSX hackintosh setup...there are 3 partitions, two are HFS and one NTFS, and the OSX was hacked to run on a standard Master Boot Record partition system.
For the question marks appearing, a short explanation. Imagine your hard drive is a vinyl long play record with (in my case) three songs on the side, and the quiet part between songs defines the partitions. Now imagine the chaos if those quiet spots disappear, and you don't know where one song ends and the next begins...Now imagine one song is quiet violin music, the next Henry Rollins Band, and the last, explosion and gunfire sound effects...
The MBR tells the computer where the partitions (songs) and how long they are...and even what kind of partitions they are...if it get corrupted or disappears, the data is still where you left it...you just don't know where it is. And like the album without breaks, you can make a duplicate of the data, but you still can't use it.
Well any time you can see a drive, but it won't boot, assume MBR problems...it is the only thing you can fix that won't make things worse (for the most part).
So my big problem is HOW to fix these oddball partitions.
I knew that somehow I had booted the Mini9 before it had an operating system, and then partitioned the drive, installed the OS etc. So for roughly an hour I went about trying to retrace my steps to boot it of a USB thumb drive...then I remembered that I actually booted it off a linux boot CD...so I dug around and found the USB DVD drive...and the linux CD.
The one I had was actually a Gparted live CD (GNU Partition Editor). I booted it and ran Gparted...it sees a blank drive...or more accurately, it does not see any partitions. Now a mistake would be to create partitions at this point...'cuz now you HAVE made things worse, you will overwrite data, and it will be gone.
So drive is there (correct size)...now how to get the partition data back. I can't run a windows boot disk, it would puke over non windows partitions and probably trash the disk.
So I looked at the places I used to create the hackintosh MyDellMini.com...nothing that really helped...but someone did mention a program called Testdisk.
That program was on this Gparted live CD..so with much fear, I ran the program. The first time I told it to look for Intel/PC partitions...after a couple of error messages, it showed the three partitions, and their correct sizes, so I knew then that I has simply lost the MBR partition table.
However in front of each partition was the letter D that according to the text on the bottom means Delete (or perhaps deleted). So I went and changed the "D"s to anything else, P for Primary, L for Logical, E for Extended, or * for boot. When I did that, the first partition (used to fool OSX into booting) and the NTFS windows partition showed green...but the OSX partition had to remain D or the text on the bottom said something like "invalid disk" or something equally useful.
So I backed out of those menus to the top of Testdisk. This time I chose the Mac OS partition style...I didn't think it would work, but what the heck. It did its full scan and showed 2 partitions both in Green with P in front.
But the numbers didn't look quite right (locations on the disk)...so I backed out again and did the Intel/PC choice again. This time it showed all three partitions again, however this time all three were in Green, and the first one was a * (boot) with the other two showing P.
I hit apply, it did its thing and I rebooted. Of course it didn't boot. I actually didn't expect it two, because as I remembered, the actual boot was on the OSX partition, which also had the boot menu that allowed me to dual boot the computer to windows.
So I re-booted the Gparted Live CD, and this time when Gparted ran, it correctly showed the partitions...I simply set the OSX partition to boot, and rebooted...ta daa.
You may wonder how I knew which partition was which...the first partition is only about 100megs. The windows one was NTFS...that left the 19 gig HFS partition that was obviously the OSX one.
SO if you see 'No operating system found', try to repair the MBR first.
There is a down side to this...usually when the MBR fails, and you see slow downs in disk access, those are signs the drive is failing...so probably time to make a backup.
Saturday, October 23, 2010
Android on the Nokia N800
I have let dust settle on my N800 ever since I got the iPod and my HTC TP2...shame on me.
Now I have a new reason to break it out. Nokia stopped updating the software on the older N series...and some things never worked right...like the camera with the video chat capability...that only worked with other n800/810s.
I don't know when I will attempt this...funny enough, I do normally do stuff like this when I am at home, but now with work, I am in NYC more than I am home...so I may do it in NY.
But here are the links
Short article at Android Authority...with video of it in operation on a N800.
Short article at Symbian Guru.
Nitdroid N900 entry (how to)...the port being actively worked on.
Nitdroid N8xx entry...work on this port temporarily halted until N900 is stable.
Nitdroid N8xx installation guide.
N8xx how to update firmware tutorial videos by Internet Tablet School.
Thursday, October 21, 2010
More Amateur Radio links and info
The basic Amateur Radio Licence level is Technician. It allows you 70CM (UHF), 2M (VHF), and 6M...and not much else.
The VHF and UHF radio/antenna install isn't too difficult of a deal, pretty straight forward.
However in the HF (shortwave, 6M on up) range, antenna design and installation becomes a large factor in your ability to get contacts.
I decided to move on up to the HF range, so I am working on getting my General licence to many more HF bands (not all but most).
I am also researching antenna design and installation.
For now I only plan on installing a Transceiver in my truck, so I need an antenna that can handle the mobile environment. The standard compromise antenna is a 'screwdriver'. Essentially an adjustable coil antenna. I said a compromise, because antenna design is based around the wavelength you are operating on...for example 10M means the wavelength is around 10 Meters long. So a full wavelength antenna is 32 feet long...a bit large for a vehicle...even a 1/4 wave antenna is 8' long. The 'screwdriver' antenna coil is tightly wound wire to give you that length in a small package.
Within the 'screwdriver' style, there are 4 big brands, High Sierra, Hi-Q, Tarheel, and Scorpion. There are fans of all the brands, I won't get into that.
I want a 'screwdriver' that is more compact, so I won't break it off if I drive my truck into a parking garage etc. That leaves the High Sierra Sidekick, and the Little Tarheel HP, and the Scorpion Shorty.
Now the screwdriver part of these antennas is the coil is motorized and that is what makes it adjustable for the different bands. So the hard part is how to adjust that coil to the best position to match the radio and frequency. So you need a controller.
There are 2 big brands (other than what the antenna companies include) Turbo Tuner, BetterRF. Both of those brands interface with the radio to correctly tune the antenna.
As far as radios go...I have narrowed it down to the Kenwood TS-480SAT, with the Icom IC-706MKIIG as a very close second (or the IC-7000 if I was rich).
For antenna I am looking at the High Sierra Sidekick, and the Turbo Tuner to control it.
So that is the equipment...but again, HF setups require some work to get the maximum operation out of that investment.
Alan R. Applegate (K0BG) has a ton of info on his website on antenna choosing, install, wiring, etc. If you are installing an HF system you MUST read through his site.
Hank Breedlove has a machine shop and makes some nice hardware that you might need in your antenna install. Personally I am looking at the EZ Over Antenna Mount & Quick Disconnect.
BTW, if you are planning to buy something Amateur Radio related...then visit the reviews at eham.com.
Finally, a friend of mine is planning to launch a balloon to space (or near space) loaded with cameras and an amateur radio setup with an Arduino board running APRS.
That sparked my curiosity so I found a couple of web sites...BEAR and ARHAB. The ARHAB site has a list of all the future balloon releases and links to the project with tracking or video info. Both sites list the hardware they are launching. But a bunch of it is sold here Argent Data Systems.
...hours go by...
So I was trying to find info about using the D710 and the 480SAT together in a cross band repeater setup...
And I come across Hampedia.net. A site full of hardware mods to radios...
Like this one that extends the transmitter frequency bands of the TS-480.
...hours go by...
So I was trying to find info about using the D710 and the 480SAT together in a cross band repeater setup...
And I come across Hampedia.net. A site full of hardware mods to radios...
Like this one that extends the transmitter frequency bands of the TS-480.
Some interesting websites and videos.
Just some websites that don't fit any of my categories...so here they go...
It is always time for pushups. How about 100 pushups at one time?
How to download MegaVideo videos.
GPS Underground-a forum with data and hacks for GPS hardware.
This is a visualization of the housing bubble pop...Jonathan Jarvis does a terrific job turning data into visuals...look at some of his other projects.
How about a video mapping all of the Nuclear Explosions from 1945 to 1998
How about a how to on making your own Ballistic Gel.
Charity Navigator - background and info on charities...so your donation does the most good.
GPS Underground-a forum with data and hacks for GPS hardware.
This is a visualization of the housing bubble pop...Jonathan Jarvis does a terrific job turning data into visuals...look at some of his other projects.
The Credit Crisis - Animatic from Jonathan Jarvis on Vimeo.
Next is a website that came out about 6 years ago that shows the connection between the various board of directors and other top level agencies...you have to play with it to see. I don't know if the data has been updated, but it is still eye opening.
Astromart - If you want anything from a actively cooled camera to a house sized telescope and everything in between...for sale.
Super Mario Bros. on a sidewalk...a student at the University at Hannover Germany displayed the whole game on a sidewalk...you have to see it to believe it...but even better is how he did it.
First the game
Super Mario Bros. from Andreas Heikaus on Vimeo.
Now the how to
Super Mario Bros. on a Sidewalk - Making Of from Andreas Heikaus on Vimeo.
How about a how to on making your own Ballistic Gel.
Charity Navigator - background and info on charities...so your donation does the most good.
ReadyNAS NV+ revisited
I have had my ReadyNAS for a few years now, and still like it...in fact I am thinking about getting another one, stuff some 2TB drives into it as a video server.
Newegg is selling them with 2 1TB drives installed for $390 with rebates and free shipping. But I will get an unpopulated one and stuff in 4 2TB drives.
Before I decided to buy another NAS, I found some web sites that made me decide to stay with the NV+...mostly because there is a huge price jump to the next models...but partially because the NV+ still holds its own.
While I was surfing around I found this blog Bott's Thoughts.
Bott has a ton of info on setting up and running the NV+ as well as quite a few other things/hacks you can do with/to it. The above link goes to a tutorial on setting up the NV+, very handy!
If you decide to get the NV+ (or many other NASs ) you need to make sure the drives you buy will be compatible, or you may have reduced or no performance.
For the ReadyNAS, on the Netgear website you can see the current list of compatible drives.
For the NV+ there are currently 4 2TB drives to choose from.
| Western Digital | Caviar Green WD20EARS | 2 TB | 3Gb/s | 64 MB | |||
| Hitachi | Ultrastar A7K2000 HUA722020ALA330 | 2 TB | 3Gb/s | 32 MB | |||
| Hitachi | 7K2000 HDS722020ALA330 | 2 TB | 3Gb/s | 32 MB | |||
| Seagate | Barracuda LP ST32000542AS | 2 TB | 3Gb/s | 32 MB |
Saturday, October 9, 2010
iOS 4.1 on my iPod Touch
Knowing that early adopters seem to have pain and suffering, I now wait to do BIOS/Firmware/OS updates.
iOS4 has been out for a while, and out for the iPod for a few months...but since my iPod is Jailbroken, I knew that at that point, there was no Jailbreak for an OS above 3.1.2.
Well Apple released 4.1, and in September a Jailbreak was released...I don't know how many devices are correctly broken etc...but I do know that my MB model iPod Touch 2G IS!
I simply followed this guide at crispytech.com . No muss no fuss. The Apple things were backed up and reinstalled automatically (apps/media/settings), however the software I installed using Cydia had to be manually reinstalled, but I did not have to re-buy anything.
I didn't want to upgrade the OS, but the new apps I wanted required OS4 or higher...
But there is another reason to upgrade...if you have a 3GS, you get built in multitasking. (which you also can get if you jailbreak). However, everyone get the new folder option. You can dump app icons together and create a folder icon that you can drag around and rename. Of course I couldn't figure out how to do this simple task...so I found this quick explanation. The quick summary is put an app icon over another one, and you get a folder...taa daa.
I am still waiting on some apps to be updated to OS4 (from Cydia), but the apps I use all the time work just fine.
A couple of quick notes...
I use Handbrake to rip DVDs to iPod files and drag and drop using iTunes...but a funny thing about how iTunes works...I can't pull those same files off. So I had to found a Guide (that I lost the link to) and installed Mac software Senuti. The trial version was all I needed so copy the movie files back off.
Monday, October 4, 2010
AR.Drone not ready for prime time?
The AR.Drone was finally released for sale in September. Folks have been buying them, flying them with their ipods/iphones/ipads and either crashing or completely losing them.
A common problem seems to be the AR.Drone suddenly climbs out of control and is either taken by the wind, or the user is able to hit the Emergency button before it goes out of range and it drops like a rock into pieces.
So I want one...but not quite yet.
But I am following along and seeing if the number of these flyaways drops as the company (Parrot) updates the hardware and firmware.
Meanwhile...some links...
The AR.Drone main website.
The AR.Drone official forums (that apparently are not moderated very well...nor do the tech folks show up)
ar.drone flyers, an enthusiast site.
This website is mostly about the owners cycling experiences...but there is a large AR.Drone section with some mods and tech info.
air drone.de, a German (language) enthusiast site with some good mods
-specifically this mod of a linux based controller for the AR.Drone with video recording.
Sunday, September 26, 2010
MakerBot etc (pt3)
MakerBot, RepRap, CNC, it was all there from hobby level to pro.
I have been interested in computer controlled tools ever since I first saw one (probably a milling machine). I have WANTED one ever since I saw that you could control a Dremel in 3 axis using surplus stepper motors and a cad program on Linux.
Since that time the home hobbiest machines have gotten better and better. Now not only can you use a Dremel to sculpt in 3-D, you can build a rapid prototyping machine that creates objects using hot extruded plastic.
So the vary first thing I saw when I got to Makers Faire (after a Spinal Tap-ish hunt for the location...with random other people) was a demo by the NY University ITP lab of a 3 axis Dremel CNC controlled by an Arduino board. (Arduinos and other hardware were for sale at the Faire) A computer (windows in this case running the software "Processing" ) sends the cad data to the Arduino board via USB, the board converts that into data to tell the stepper motors where to move. The CNC hardware available from Bluumax CNC ($415). ITC lab created it to build circuit boards.

The following video is of the Arduino CNC demo done by the NYU ITP folks...I cut out the first 3 minutes of trouble shooting to find that the power plug was turned off (oops).
Next I saw a demo by MakerBot industries of their brand new latest generation MakerBot "Thing-O-Matic". The MakerBot is a rapid prototyper that uses a stream of hot plastic to 'print' a 3-D object...very cool...these also use an Arduino board.

The brand new top of the line one is $1200, but it is a complete kit. The frame is made out of laser cut wood pieces. It holds a 12x12x12 work area, and you can make things just smaller than that...(not sure about the height). If you decide you have outgrown the MakerBot, you can use it to create the RepRap.
The RepRap is another rapid prototyper, but this one can be created by a rapid prototyper...it looks like an erector set and is all open source. I think one of the benefits is you can make it a custom size to create odd sized objects. With the MakerBot you are stuck to one size...well now two sizes.

There were about 20 or so MakerBots and about 10 versons of the RepRap in a couple of tents, making stuff, or showing off what they made...I really want one of these.


This doesn't really fit exactly in this category...but is related...the company WidgetWorks Unlimited was showing off their line of vacuum formers. (stretches plastic sheet warmed in oven over form), a 12x12 was about $300
Ben Heckendorn (Ben Heck) at Makers Faire (pt2)
I knew Ben Heck would be there because he said so in his blog post;) I have been following his projects since the beginning.
For those who don't know Ben Heck (Ben Heckendorn) the hardware hacker from WI, back in 2000 he created a hand held Atari 2600 that even took cartridges. He has since built many similar custom things, some for fun, some for clients. His most recent two creations were a Bill Paxton fullsize pinball machine with lights/bumpers/sound effects....the works. Why? he wanted to. His other recent build is a "laptop" XBox 360. He took a brand new Slim model, created a shell for it, and mounted a 1280x720 LCD screen in the top (that is the highest 360 native resolution)

He recently joined up with Element 14, a electronics hobbyist site with parts and info, and now he has a bi-weekly video where he builds a small user submitted project, and continues work on a large project. The current large project is another laptop Xbox 360 (this is actually the 3rd)...he had it there at their booth, and fired it up, so it is almost done already...I want one...He has a couple other ideas for large projects...one is another pinball machine. I don't think they hinted at any others.
I was able to talk to him at his booth, nice normal hobbyist that was able to turn his hobby into his job.
Here (in 2 parts) he talks about his new show and new projects...and I ask him about Bill Paxton Pinball. (part 2-4:10)
Pt1
Pt2
Maker Faire NYC 2010 (pt1)
Maker Faire NYC 2010
I was fortunate enough to happen to be in Queens NY Sat the 25th for the first day of the first ever Makers Faire in NYC. It was held at the World Fairgrounds in Flushing...specifically the NY Hall of Science. That was a brilliant move, because the Science Museum and other things were open, so there were things for everyone to do (i.e. kids and adults were kept busy the entire time)
I had seen pictures and reports of other Makers Faires, but had never been to one before. For me it was quite a treat, definitely right down my alley as far as hardware hacking and my other stacks of projects go. It was almost like a science fair/carnival for adults...but aimed more toward the home hobbyist, but definitely there were some serious commercial devices being demonstrated/vended. In addition there was a craft area...very large, not as large as the tech area but you could spend a good part of the day just looking at that stuff.
So there are MAKE: things and craft things...kind of matches the magazine that sponsors this event, MAKE:
I have read some of their articles online, there is something for everyone... builder/hobbyist.
I will have two other blog entries, one on Ben Hecklethorne, and one on the various 3-D prototyping machines.
The other things I enjoyed
-watching, no, experiencing Arc Attack! The Tesla Coil band...you have probably seen videos of them on line...short summary is 4 Giant Tesla arc generators, a robotic drummer, a human guitarist wearing a chain mail arc suit, and loud music created by the arcing Tesla coils. You have to see these guys...probably the most dangerous rock band in history;)
-EepyBird, the Coke Mentos folks did a show near the end of the day...again, a lot more fun, if not wetter, in person.

-There was a giant size "Mousetrap Game". You know the one you played as a kid...a Rube Goldberg device...it sounded better in theory than in person...but definitely a large thing to see.

- Need a robot that solves Rubik's cubes?

-Want some animated Halloween decorations this year?

-How about a merry go round powered by V-1 rocket motors (well similar to the V-1 motors used in WWII by the bad guys) I didn't see it running, but I heard it all over the Faire throughout the day.
I saw what I wanted/needed to see in a day, but if you get the chance you should check it out.
I was fortunate enough to happen to be in Queens NY Sat the 25th for the first day of the first ever Makers Faire in NYC. It was held at the World Fairgrounds in Flushing...specifically the NY Hall of Science. That was a brilliant move, because the Science Museum and other things were open, so there were things for everyone to do (i.e. kids and adults were kept busy the entire time)
I had seen pictures and reports of other Makers Faires, but had never been to one before. For me it was quite a treat, definitely right down my alley as far as hardware hacking and my other stacks of projects go. It was almost like a science fair/carnival for adults...but aimed more toward the home hobbyist, but definitely there were some serious commercial devices being demonstrated/vended. In addition there was a craft area...very large, not as large as the tech area but you could spend a good part of the day just looking at that stuff.
So there are MAKE: things and craft things...kind of matches the magazine that sponsors this event, MAKE:
I have read some of their articles online, there is something for everyone... builder/hobbyist.
I will have two other blog entries, one on Ben Hecklethorne, and one on the various 3-D prototyping machines.
The other things I enjoyed
-watching, no, experiencing Arc Attack! The Tesla Coil band...you have probably seen videos of them on line...short summary is 4 Giant Tesla arc generators, a robotic drummer, a human guitarist wearing a chain mail arc suit, and loud music created by the arcing Tesla coils. You have to see these guys...probably the most dangerous rock band in history;)

-EepyBird, the Coke Mentos folks did a show near the end of the day...again, a lot more fun, if not wetter, in person.

-There was a giant size "Mousetrap Game". You know the one you played as a kid...a Rube Goldberg device...it sounded better in theory than in person...but definitely a large thing to see.

- Need a robot that solves Rubik's cubes?

-Want some animated Halloween decorations this year?

-How about a merry go round powered by V-1 rocket motors (well similar to the V-1 motors used in WWII by the bad guys) I didn't see it running, but I heard it all over the Faire throughout the day.
I saw what I wanted/needed to see in a day, but if you get the chance you should check it out.
Monday, July 19, 2010
What is with all the comment spam?
I rarely get comments...that doesn't bother me...what does bother me is that daily I get some kind of SPAM comment.
A bunch of Chinese(?) characters, a short english phrase that doesn't match the topic...and a link to some site, porn or warez no doubt.
A shame really.
A bunch of Chinese(?) characters, a short english phrase that doesn't match the topic...and a link to some site, porn or warez no doubt.
A shame really.
Move Evolution data to new install...
I am not a Linux GURU, nor am I a noob. However moving the evolution data was an incredibility painful process.
First, Evolution has a built in (well built in if you add it) back up system, that will back up everything into a nice .gz file. That part did work just fine.
ALSO this same app is supposed to be able to install your evolution data from a backup. Let me just say that (depending on how much data you have...and mine is in the Gigs) it takes a while to make this data file, and about twice as long to re-import.
Unfortunately the re-import was not working for me, maybe I had too much data, maybe there had been a large change between my version of Evolution, and the new one...
Suffice to say the recovery of my data into the new Evolution did not work period...it would run for a few hours attacking the .gz file, sifting through the data, then crash. I will just say I ran through many iterations, but got the same result.
So obviously I need to move the data by hand...how?
I looked at hundreds of links, until I found an easy (ha) answer.
I used the data in these links...mostly the first one...but I manually pasted the files...bad things happen to me whenever I use the CP link. And I needed to run the File Browser in root to do it.
First and simplest link
second
third.
The first hard part was figuring out where all the files were hidden (and they are hidden files btw).
After I had all the files...I pasted them where they needed to go.
Then because I needed to be in root with the File Browser...I had to change all the permissions back...duh.
Simple walk through of permissions.
That whole process from when I first decided to move the Evolution data, till I got a working version of Evolution was 3 days. And after all the research and trial and error was done, it actually only took a couple of hours...and mostly because my email files are so huge.
I would like to report that it is all good...but for some reason, whenever I open the calendar for the first time, an error message showed up that "Tasks" failed...probably another permissions issue.
Ubuntu 10.4
I had been putting off upgrading my Ubuntu install...because every time there is a major upgrade...I spend weeks fixing things.
But in this case my old Ubuntu install was really old (8.10?), running out of room, and having difficulties.
Mostly I delayed the upgrade because I was using VM and doing my office work on that.
Well my VM was acting poorly...out of disk space (virtual expanding drive?)...so I moved the applications I was using to a different machine running Win7 (VM was an XP install).
Anywho, I had an extra 500GB sata drive lying around...
Actually installing Ubuntu 10.4 was mostly straight forward, but the disk manager still needed help...I had to boot into the Ubuntu on a disk, run the disk manager to see the new blank drive I installed, then reboot to the installer.
Every time I change or install an OS, I start with a new drive, and keep the old drive plugged into a USB adapter to transfer...or reboot if necessary.
Well once again it was necessary. I use Evolution for email and calendar. I use Firefox for web browsing. I don't like starting from scratch...I just want to move stuff over to the new computer.
Copying all my settings etc into Firefox was easy...there is an Add-on called FEBE that backs up all your Firefox stuff, extensions, themes, bookmarks, etc. Just install it on the old Firefox, run it....then install that extension (FEBE) on the new Firefox, and do the restore.
It isn't quite that simple...but simple enough. The FEBE website, softwarebychuck.com has all the tutorials you need.
Now Evolution was a completely different deal...and I will make it a separate topic.
Back to Ubuntu 10.4
I will say that video card and monitor support is superior to the old Ubuntu I was running. An icon at the top of the screen lets you adjust your settings...including running multiple monitors, choosing if mirrored or expanded view...and resolution.
It also boots much faster than the older version. However the initial install required literally hours of upgrades before it was done...I thought it had crashed it was such a slow process.
But overall, worth the effort to upgrade.
...next Evolution...
Saturday, July 10, 2010
Kenwood TM-D710A programming info
Anyone who has used this Amateur radio knows that programming it by using the faceplate and microphone is only for the strong willed.
I had used the programming cable and free Kenwood software (MCP-2A) before, but I learned some things this time.
I wanted to program a bunch of repeaters along my drive, complete with CTSSS, naming for location, and organized by area...so I don't have to scan the entire list...just the area I am in.
So some notes:
First a great location for repeaters is at http://k5ehx.net (this link shows the actual repeater search map)
You click on the are you want, show repeaters that cover the area...then at the bottom of the list of repeaters (the column left of the map) you will see a group of links to save your searches at.
I clicked on a town at a regular interval along the drive, and exported each search result as a CSV.
Then I imported each CSV into a spreadsheet program (Comma Separated Values, so during the import, choose comma, not tab), and pasted all the results into one big spreadsheet. For naming the repeaters (how they would show on the radio) I decided to use City and State.
This radio only has 8 characters for names, so I used a spreadsheet function to do the editing for me {CONCATENATE((LEFT(C3);6);C4)} The first function glues text files together, the second imbedded function truncates the name (at C3) to 6 letters. The C4 is the two letter state.
There are some interesting codes the Kenwood software uses to import the files...so the easiest method is to pull the data from your radio first, then EXPORT to HMK using the software. ALSO Save that file (the software will save as .mc2, it is not a text file, and not editable...but has all your important settings)
The HMK file is simply a CSV file renamed. Just change the .HMK to .CSV and import it into your spreadsheet.
From there, just make your repeater list match what the Kenwood software wants, and then paste into that HMK you exported and renamed.
When all done, save your new repeater list as a CSV, close the file (I would make a copy) and change the .CSV to .HMK again, then import it back into the Kenwood software.
Don't be scared, but when you import the HMK all your other settings will disappear (callsign, APRS info etc). The solution is open another copy of the Kenwood software and load that .mc2 file you downloaded from the radio. Now just highlight the list of channel memories you imported from the .HMK file, and paste them onto the memory number on the other copy.
You have to just try it...it will make sense after a couple of tries.
Then save that (both programs) with some names you will remember...and put the version you pulled from the radio back into the radio.
If you paste YOUR list of imported repeaters into the list of memories you downloaded from the radio, then things will work much easier.
There is a help file, and it does show what the program is looking for in the HMK file.
Friday, June 18, 2010
Google Calendar...and phones...
For those not in the know, Google Calendar works well, and (like a lot of things) seems to be becoming the norm.
I find it easy to upload and sync .ics files to the web based calendar, but getting the data to my phone wasn't working 100%.
First I used this webpage to set up a Sync using Activesync and Google.
But still quite a few calendar items were not showing up...for example the US holidays...then another calendar that I subscribed to didn't show up.
And by "show up" I mean it wouldn't sync to my phone...it was on the webpage but not on my phone.
There is not 'clean' way to do this, but the work around is to download the shared calendar you want to add to your calendar, then import that calendar back into your Google calendar.
It is clumsy but works.
Here are the directions.
...unfortunately there is no way to update the imported calendar...if the shared one changes, you have to re-import it, and remove the dupes yourself.
But it is better than either typing in each entry...or individually importing each entry.
I find it easy to upload and sync .ics files to the web based calendar, but getting the data to my phone wasn't working 100%.
First I used this webpage to set up a Sync using Activesync and Google.
But still quite a few calendar items were not showing up...for example the US holidays...then another calendar that I subscribed to didn't show up.
And by "show up" I mean it wouldn't sync to my phone...it was on the webpage but not on my phone.
There is not 'clean' way to do this, but the work around is to download the shared calendar you want to add to your calendar, then import that calendar back into your Google calendar.
It is clumsy but works.
Here are the directions.
That is what I did, and now all that stuff syncs to my phone...SOLUTION!!!!!!!!!

5/22/09
ok this is how you do you import this calender to you calender its the US 2009 Holiday Calander once you do this you can sync and load the holidays to you device.
you can either use the link or download it to your computer and upload the calender to your own via HTML or FILE.
http://www.google.com/calendar/ical/usa__en% 40holiday.calendar.google.com/ public/basic.ics
...unfortunately there is no way to update the imported calendar...if the shared one changes, you have to re-import it, and remove the dupes yourself.
But it is better than either typing in each entry...or individually importing each entry.
Thursday, June 17, 2010
iBluever screenshots
I thought I would show some screenshots of how to setup iBluever, and how to operate.
This is what you first see when iBluever starts...note the "Connected to Bluet00th daemon."

Now we turn iBluever ON
Note "Bluet00th initialized successfully"

Now it starts populating the list with visible bluetooth devices.

Now it has named all the visible bluetooth devices.
click on the device you wish to use (or hit the (>) if changing settings)

Here is the settings screen, these are the only settings I used for my Sprint phone.

Now go back to the main screen, and tap on the device you are connecting to. (all the visible devices will still be on the screen)
The script will start, and will take longer the first time while your phone is linking to the iPod etc...watch your phone for pop up messages about PIN or data access.

Now script has successfully completed, and it shows a green checkmark and the mac address etc below the device name...
...if it doesn't successfully complete, the last script step will still be showing below the device name.

After you have successfully connected to your phone, and then turned iBluever off, your settings will be saved, and from then on just click on the device name to connect...
BTW, on my sprint phone I needed to change a registry setting to share data over the bluetooth...see previous posts on the subject.
Thursday, May 13, 2010
Sprint Touch Pro 2 Bluetooth tethering
Well this caused me much anguish...I was fiddling around with the iPod, and caused iBluever to crash in the process...and couldn't get it working...so I rebooted my phone, and got a different failure...
I need to remember, that if I reboot the phone, I need to make this change.
[HKEY_LOCAL_MACHINE\Comm\InternetSharing\Settings]
"ForceCellConnection"="Sprint" (it will always revert back to say "phone as modem" when you reset your phone)
iBluever runs fine, Bluetooth on the iPod is not as rugged or smart as I would hope.
I cannot run roqyBT (an app that allows the iPod to access a bluetooth GPS device) at the same time as iBluever is connected.
iBluever errors and what they might mean...
-L2CAP fail
=the iPod is not being seen by the TP2...I have mine set so that only paired devices can connect...
==solution is pair the iPod to the TP2 before starting iBluever
-chat timeout at CONNECT/r
=the iPod has connected to the TP2 and is attempting to access the internet, but failing
==solution 1, watch the phone and select "Agree" when the iPod wants to use services...
==solution 2, check that registry entry at the top of this post again.
-RFCOMM not connecting
=somehow the bluetooth is not connecting like it should
==solution 1, turn off iBluever then back on
==solution 2, turn off iPod then back on
==solution 3, turn off iPod and Phone, then back on (and don't forget the registry entry)
BTW, I actually don't have problems with iBluever, but I created an issue when I linked up the iPod to a bluetooth GPS.
The complete steps I took to enable the BT tether on the TP2 are here...
Make the following changes on your TP2 with a Registry editor:
1. [HKEY_LOCAL_MACHINE\Comm\InternetSharing]
Extension="" Delete the "isext.dll"
2. [HKEY_LOCAL_MACHINE\Comm\InternetSharing\settings]
ForceCellConnection="Sprint"
3. [HKEY_LOCAL_MACHINE\Software\OEM\Wmodem]
Check Profile=0
Connected=0
Multi-NAI=0
WModemDUN=0
4. [HKEY_LOCAL_MACHINE\Software\WIDCOMM\Plugin\DUNServ er\ControlPanel]
Enabled=1
But the only one that keeps changing (and I don't even know if the rest of the steps are important) is step #2.
Tuesday, May 11, 2010
iBluever 1.0.11 works - iPod bluetooth tether app
The iPod SpeedTest.Net app shows 179kbps down and s up, with a 365ms ping.
That is pretty normal for my Sprint service.
I have a bunch of apps that access the internet, ALL of my Apps work...I have tested about 20 apps.
If you have an iPod Touch (and maybe an iPad) you want this.
That is pretty normal for my Sprint service.
I have a bunch of apps that access the internet, ALL of my Apps work...I have tested about 20 apps.
If you have an iPod Touch (and maybe an iPad) you want this.
Saturday, May 8, 2010
iBluever - Bluetooth iPod tethering
I wrote previously about my iPod Touch, and that it runs all iPhone software.
I also wrote about the new Sprint Windows Mobile phone I got.
Well this developer from China, has been working on an App for the iPod (or iPhone) to tether an internet connection with bluetooth.
If you are unfamiliar with the terminology...
...Most cellphones now have a data connection, many can act as a modem for a laptop if you connect the two with a data cable (usb usually nowdays). So that gives you mobile internet access while 'tethered' to the phone.
...Bluetooth is a data connection protocol that uses very little power...many phones can uses that bluetooth connection as a network connection...and can share the internet connection via the bluetooth, sort of like a wireless bluetooth router.
So the term bluetooth tethering was born.
Now as we all know (or anyone who has used an Apple product) Apple products are very locked down...no fun allowed.
So the 'underground world' of iPods and iPhones involves "Jailbreaking". A way to break Apple's ability to lock the device down.
You can imagine that software that allows people to get iPhone functionality without buying an iPhone would not be supported by Apple...so to get this software, and other good items, you can't go to the App store. You need to Cydia, which is the App store for Jailbroken iPods and iPhones.
Back to subject.
Right now iBluever is available on Cydia. It is still an early product...mostly beta...there is a demo version and an unrestricted version you can buy.
The developer recommends trying the demo first, and if it doesn't work perfectly, don't buy the full version.
Right now in my configuration, using my Sprint Touch Pro2 as the bluetooth tether, the demo works...mostly.
I have iBluever version 1.0.8 (demo) and here is how I used it...
- first I had to pair the iPod to the TP2 using the normal iPod bluetooth.
- turn off iPod bluetooth, and start iBluever
- select my phone in the iBluever screen, select a pin, and put #777 in phone number block.
-- those were the only entries
- back to the iBluever main screen select the phone again and after a while, it will show a pop up confirming the connection
- meanwhile on the phone a few messages will show, first to put the pin in, second to authorize the ipod to access the internet
the demo only runs for a little while, Opera works, the App store seemed to work, The Weather Channel App worked.
So I hope the rest will be fixed and I will be able to buy the working product.
Tuesday, May 4, 2010
More TP2 and iPod/iPhone
I wanted to point out some subtle features...and describe the comparison better.
The iPod Touch (for those who don't know) is essentially an iPhone without the 3G phone (and microphone) . It is smaller than an iPhone (thinner, same size screen), it has the accelerometers like the iPhone...but no GPS...so not like the 3GS.
The iPod runs all the iPhone apps and has the wifi connection for internet.
My iPod is in a Mophie battery case that allows charging, and actually allows a better grip on the iPod...but it makes the iPod about the same thickness as the iPhone, and a bit longer.
Now to compare the iPod to the TP2.
The TP2 also has accelerometers, and will orient the screen based on position of the phone, or if the keyboard has been slid out. Also the keyboard is backlit if the room is dark. There is a built in GPS, but the Google maps plugin (from Google obviously) will pinpoint your location fairly accurately just using the cell signal...and if you are outside the GPS will immediately lock in (if you select GPS on the Google maps menu).
The screen of the TP2 is longer but narrower than the iPod (it is a subltle difference) but essentially they are the same size display.
With my iPod in it's battery case the TP2 is still thicker...outside the battery case, the TP2 is more than twice as thick as the iPod...so thicker than an iPhone.
The TP2 is overall narrower than shorter than the iPod (outside the battery case)...but again only by a little bit (a few millimeters).
(some size comparisons)

(shorter is left)
HTC Touch, iPod Touch, Samsung Instinct, HTC Touch Pro 2, mophie iPod battery case.
(thinner is left)
iPod Touch, mophie iPod battery, Samsung Instinct, HTC Touch, HTC Touch Pro 2.
As far as screen resolution...I cannot perceive a difference.
The TP2 has a standard Mini USB port for charging and data, a standard headphone jack, a camera, speakerphone. It has physical buttons for the phone, a windows menu button and a 'back' button right on the front.
Obviously the iPod and software are clamped down, so it runs efficiently and smoothly.
With the TP2, HTC puts their own user interface over top the WM6.5. I happen to like it, there is probably a slight performance penalty with the eye candy, but why have a flashy touchscreen phone if you don't like eye candy.
It isn't exactly as snappy as the iPod...on the otherhand, it is multitasking, unlike the iPod...which really bogs down when you attempt multitasking (can be done, but not the norm).
So because I can switch back and forth between running apps on the TP2, I will accept a slight sluggishness at times compared to the iPod...
I will freely admit, after my time with the iPod Touch, if I could have the functionality of my TP2, with the interface of the iPhone without the AT&T lockin, I would own a 3GS.
Reviewers have complained that it still uses WM6.5, but it seems like WM7 will not have the options of the older WM, and will require different apps, if it allows them at all. So we will see what my future phone will be...
The iPod Touch (for those who don't know) is essentially an iPhone without the 3G phone (and microphone) . It is smaller than an iPhone (thinner, same size screen), it has the accelerometers like the iPhone...but no GPS...so not like the 3GS.
The iPod runs all the iPhone apps and has the wifi connection for internet.
My iPod is in a Mophie battery case that allows charging, and actually allows a better grip on the iPod...but it makes the iPod about the same thickness as the iPhone, and a bit longer.
Now to compare the iPod to the TP2.
The TP2 also has accelerometers, and will orient the screen based on position of the phone, or if the keyboard has been slid out. Also the keyboard is backlit if the room is dark. There is a built in GPS, but the Google maps plugin (from Google obviously) will pinpoint your location fairly accurately just using the cell signal...and if you are outside the GPS will immediately lock in (if you select GPS on the Google maps menu).
The screen of the TP2 is longer but narrower than the iPod (it is a subltle difference) but essentially they are the same size display.
With my iPod in it's battery case the TP2 is still thicker...outside the battery case, the TP2 is more than twice as thick as the iPod...so thicker than an iPhone.
The TP2 is overall narrower than shorter than the iPod (outside the battery case)...but again only by a little bit (a few millimeters).
(some size comparisons)

(shorter is left)
HTC Touch, iPod Touch, Samsung Instinct, HTC Touch Pro 2, mophie iPod battery case.

(thinner is left)
iPod Touch, mophie iPod battery, Samsung Instinct, HTC Touch, HTC Touch Pro 2.
As far as screen resolution...I cannot perceive a difference.
The TP2 has a standard Mini USB port for charging and data, a standard headphone jack, a camera, speakerphone. It has physical buttons for the phone, a windows menu button and a 'back' button right on the front.
Obviously the iPod and software are clamped down, so it runs efficiently and smoothly.
With the TP2, HTC puts their own user interface over top the WM6.5. I happen to like it, there is probably a slight performance penalty with the eye candy, but why have a flashy touchscreen phone if you don't like eye candy.
It isn't exactly as snappy as the iPod...on the otherhand, it is multitasking, unlike the iPod...which really bogs down when you attempt multitasking (can be done, but not the norm).
So because I can switch back and forth between running apps on the TP2, I will accept a slight sluggishness at times compared to the iPod...
I will freely admit, after my time with the iPod Touch, if I could have the functionality of my TP2, with the interface of the iPhone without the AT&T lockin, I would own a 3GS.
Reviewers have complained that it still uses WM6.5, but it seems like WM7 will not have the options of the older WM, and will require different apps, if it allows them at all. So we will see what my future phone will be...
Sunday, May 2, 2010
Latest phone...HTC Touch Pro 2

I have needed (wanted) a new smart phone. I like many things about the iPhone3GS...but I don't like the locked down aspect, nor do I like AT&T.
Besides, there is some windows mobile software I need to run.
I have enjoyed using my old HTC Touch, but it was limited in many ways.
There are many reviews and videos of the TP2...so I won't duplicate the effort.
I will say that the screen is as good or better than my iPod Touch...and much better and bigger than the old Touch.
It has a onscreen keyboard that in my opinion is better than the iPod one...this one is actual qwerty with the numbers and symbols where they should be...you have to jailbreak your iPod to get the same functionality...and anyone who has to deal with workplace passwords knows the issue.
AND the TP2 also has a slide out qwerty hardware keyboard.
TP2 comes with IE and Opera...I use opers more, but neither can access ALL websites.
I installed Google maps and it locates well even with GPS off...GPS locks in quicker than my old Touch.
I don't like where the power button is...I hit it all the time when using the slideout keyboard.
I don't know what the battery life is...it seems shorter than my old Touch...but I had poor battery life on my old touch when I first got it, it improved over time with better settings.
So far the only utility I have added is PocketSheild to protect from buttdialing and other touchscreen phone annoyances...
I typed this blog entry on the HTC Touch Pro 2 from Sprint.
Sunday, March 21, 2010
Timelapse cam setup
...CHDK is the software...I mentioned that earlier...this is the hardware.

This is a SportsPack waterproof camera housing. It has slide in mounts for a variety of camcorders...and is designed to electronically integrate with Sony camcorders (controls on top run camcorder)...
...obviously I am only using the housing...but I was able to use one of the extra slide in mounts to build a mount for my camera...it just barely fits...I don't think a DSLR would fit at all...we will see about that some time in the future.

Front view...I have the camera so the lens is almost touching the front glass...and is as centered as I can get it.

The camera mount slid out...showing the hacked together bracket and battery pack.

Another view showing the camera on its mount with the battery pack.
...this is the result...this attempt was with the mockup of the current mount...the lens was too far from the front glass in that setup...
Saturday, March 20, 2010
Astrophotography
I always assumed you had to buy a lot of expensive hardware, and sit outside all night pushing a cable remote shutter control to take pictures of the stars.
Thanks to modern cameras...you can if you want to...or just let the camera do the work.
There are websites and books dedicated to this subject...so I won't bother...however.
...unfortunately just as I was figuring all this out and getting my setup ready...a winter storm came to visit...so I won't be able to test my theories for a few days.
Here is what I know...
CHDK will let you make repeated shots at a set interval.
...it will let you set the shutter speed (and or aperture)
I have read that up to about 20-30 second exposure times will not show star streaking (from the earth movement)
There is free software that will 'stack' exposures (sort of like what the HDR software does)
I built a large battery pack to keep the camera running all night.
So my plan is to set the exposure to 20 sec, take pictures a minute apart all night long and see what happens.
Then from there change the exposure time until just below the streak threshold.
Not only can I get movies...I can stack the shots for more detail (hopefully).
Now this camera will only shoot for about a minute shutter open time. If I want more, I will need a new camera...and some way to keep the camera in position as the earth moves...
Some robotic...VR...etc links...
So one ongoing project is the ROVIO...well some third party applications have been written for it (as well as an iPhone app). Here are a couple that I haven't tried yet, but look interesting...
http://linceovr.seac02.it/pages/viewer/ ...basically use this to build a VR world with your ROVIO as the input, and your computer as the world generator.
http://www.roborealm.com/ software to allow your robot to use its camera(s) as vision...think the DARPA autonomous vehicles...ROVIO specific software here... http://www.roborealm.com/help/WowWee_Rovio.php
http://www.mikrokopter.de/ucwiki/en/MikroKopter a multi blade helicopter...microprocessor controlled...and seems like an easy (relatively) way to make an autonomous vehicle ($1000 for the basic unit)
Now back when I was a kid...I wanted one of these...Big Trak...you can get them n0w on ebay for not much money...and of course some folks are hacking on them...
http://www.robotroom.com/BigTrak.html
http://www.thebigtrak.com/board/index.php
replace the Big Trak controls with OOPic (site only on Wayback Machine)
How about a iPhone controlled hexapod?
http://forums.trossenrobotics.com/showthread.php?t=3918
Tuesday, March 16, 2010
HDR Time Lapse Video
This is something I didn't realize people were doing...or that I would be able to do with my little camera.
But thanks to Owen Scharlotte at Timelapseblog.com I learned a ton...
I previously mentioned CHDK and bracketing photos for HDR. Well here is how to install a script that will direct your camera to take a series of pictures...
And here is a tutorial on how to take that series of pictures into Photomatix for batch processing...
...and hopefully soon I will have a demo of my own from the back yard...
Other than loading the script, you still have to go into the CHDK menus and set up the bracketing in continuous mode. Other than that, it is point and shoot.
Saturday, March 13, 2010
HDR - High Dynamic Range Photography
HDR,
I have been looking at the photos for a while, and wanted to try it...but couldn't make that first step...
A quick summary is- a normal photo averages out the exposure based on what the center of the picture is...if it is something dark, then everything else will be washed out...if it is light (like the sky) everything else will be dark.
HDR photography allows you to capture the details from both those extremes, glue them together via software, and you get a picture as real as you looking at it...or can even be super real...
If you search for HDR on google you will find plenty of good websites.
This is all I needed to know...
...previously I had put CHDK on my Canon A530 to give me control over the camera (actually specifically to do this)
...but the key was what to set where...CHDK has a submenu of its own, and that is where most of the settings go.
--here is the summary...
>Extra Photo Operations
>>Bracketing in continuous mode
>>>TV bracketing value [2EV] ...AV bracketing would be preferred, but my camera doesn't have it.
now to the normal camera menu, select continuous mode, 5 shots...and I use a 2 sec delay for the first shot.
Now sit back while the camera takes shots.
Now that you have the 5 shots, there are many ways to digitally glue them together...I use Photomatix (http://www.hdrsoft.com/)...I haven't bought it yet...hence the watermark.
Here is one of my shots, with my camera sitting on a coffee cup in my hotel window.

Friday, March 12, 2010
iPod Touch
Well, I figured it was time to join the Apple cult...Actually there were some apps that I wanted to run, I don't want to use At&t for cell, and I need a windows phone anyway.
But the Touch has all the functionality of the phone...minus the camera/microphone/gps
The first step is to jailbrake the Touch. That allows you to add software that Apple doesn't sell etc.
There are two types of jailbroken iPods...tethered and untethered. Tethered means, whenever you turn on the device from a cold start, you need to be hooked to your computer...not very useful for most people.
Untethered means that even on a cold start, the iPod stays jailbroken, and will boot normally.
So knowing that...I found out that there is no untethered jailbrakes for OS 3.1.3, or higher, nor for the 32 and 64gb 3rd generation Touch.
Also the 8gig version for the 2nd gen and 3rd gen are identical, and they can be jailbroken/untethered.
http://www.redmondpie.com/redsn0w-0.9-jailbreak-iphone-3g-3gs-and-ipod-touch-3.1.2-firmware-9140376/
So I got a 8gig 2nd gen Touch from Newegg. Downloaded iTunes, and a 3.1.2 OS , updated the Touch using 'shift'-RESTORE on the iTunes screen, and installing the 3.1.2 that I downloaded.
After a sucessful reboot of the Touch, I closed iTunes and started the latest version of 'redsn0w'.
I pointed the program to the same 3.1.2 that I had installed on the Touch, and let it do its thing. I installed Cydia...which is an apt-get type program, and you can define the repositories...so you can install your own software.
Using Cydia, I installed 'RoqyGPS' which is supposed to allow your Touch to access a bluetooth GPS. (the OS 3.0 and later for the Touch enabled bluetooth for headphones). My bluetooth GPS puck seems to not be compatible, so I am getting one that should be...http://www.roqy-bluetooth.net/hardware.html
Sunday, February 7, 2010
More Bad Caps
I have been busy, so no projects right now...but I did have the opportunity to troubleshoot my main system. BSOD etc.
After ruling out virii, and memory issues...I hooked up my Frozen CPU Ultimate LCD Power Supply Tester to the just over warranty Enermax 600W power supply...and it kept shutting down.
So I pull it out, and open the PSU up...guess what, 5 capacitors that had bulged out and and were leaking out the top...(the brown spots in the out of focus picture is the leaking stuff)

So the replacement is a Corsair HX750 with modular wiring...which let me tell you, it a very nice feature. Also it has extra dedicated wires when I get around to adding a second ATI card.
...well back to the Super Bowl.
Subscribe to:
Posts (Atom)

